Monday, May 30, 2011

Chocolate and Bacon Maple Cupcakes


baconchocolatecupcake Chocolate and Bacon Maple Cupcakes

Downtown Boulder, Colorado has become known for great little eateries, bookstores and coffee houses.  In fact, in 2010 the town was deemed the best Foodie town in the US by Bon Appetit Magazine. And considering the town is usually named one of America’s fittest cities by various media publications, many of these local boutique shops and restaurants are organic or health-conscious.  Along comes Tee and Cakes, a refreshing and decadent change to compliment the earthy cuisine in Boulder.  This shop is for the most sophisticated sweet tooth who has no fear of trying the most unique gourmet desserts. The atmosphere is cheery and as the name suggests, one can even buy a cupcake themed t-shirt while sipping coffee and enjoying cake.  One of the owners is a graphic artist who has designed a great selection of “sweet” apparel.
Since its opening, Tee and Cakes has become most famous for its superb selection of cupcakes and custom cakes for special events.  The custom cakes are quite simply … works of art.  Executive Pastry Chef and owner, Kim Boos delivers stunning designs that are not only whimsical and one-of-a-kind, but taste like heaven.  I know this first hand because I always buy my cakes from Tee and Cakes.

But if you really want something special, you must try their famous Chocolate and Bacon Maple Cupcakes.  These cupcakes have received regional and national attention as being one of the most unique and decadent cupcakes … ever!!  Even Food Network was impressed and featured this recipe on an episode of Unwrapped! So, if you’re ever in Boulder … do yourself a favor and swing by Tee and Cakes.  And if not, give this recipe a try and watch even those skeptics who say “bacon and chocolate?” beg you for the recipe.

Chocolate and Bacon Maple Cupcakes
Maple Cake Recipe
  • 2 sticks (1 cup) unsalted butter, room temperature, plus more for pans
  • 1 1/2 cups all-purpose flour, plus more for pans
  • 1 1/2 cups cake flour (not self-rising)
  • 1 tablespoon baking powder
  • 1/2 teaspoon salt
  • 1 3/4 cups sugar
  • 4 large eggs
  • 1 1/4 cups milk
  • 2 T Maple Extract
Directions
Preheat oven to 350 degrees. Line the cupcake pans with your choice of cupcake liners. Into a medium bowl, sift together flours, baking powder, and salt; set aside.
In the bowl of an electric mixer fitted with the paddle attachment, beat the butter and sugar until light and fluffy, 3 to 4 minutes, scraping down the sides of the bowl as needed. Beat in eggs, one at a time, then beat in maple extract. With the mixer on low speed, add the flour mixture in three parts, alternating with the milk and beginning and ending with the flour; beat until combined after each addition.
Using a scoop fill the cupcake liners 2/3 full.
Bake until golden and cool.
Ganache Recipe
  • 1 pound Semisweet Chocolate chopped or Chocolate Chips
  • 2 cups heavy Cream
  • Pinch of Salt
In a small saucepan over medium-high heat, bring cream to a full boil; turn off heat. Add chocolate, and swirl pan to completely cover with cream. Slowly whisk mixture until smooth. To get silky smooth ganache it takes longer to mix than you think! Add salt; stir until combined. Transfer to a clean bowl and let chill overnight or until spreadable.
When cupcakes have cooled spread some ganache on top. Chill for a minute or two. While chilling cook up some of your favorite bacon however you like it. Brian likes his chewy and Kim likes hers crunchy and toasted.
Chop in pieces and top the cupcakes and … voila!

Chocolate truffles

Chocolate truffles


Chocolate is such a personal thing. I almost feel the same with chocolate as I do with perfume. I would hesitate to offer someone chocolate (as perfume) unless I knew exactly what they liked.
By the way, have you heard of  Le Whif? The idea here is to sniff chocolate scent, getting a high from it minus the calories.
In any case, this is  made with Callebaud, which is my favorite maker with  a touch of lime zest.
INGREDIENTS: For 8 truffles (can double or triple the recipe)
  • 2 ounces of whipping cream
  • 100 g. or 3.4 ounces of Callebaud dark semi-sweet
  • 1 Tablespoon of unsalted butter
  • Zest of half a lime
  • 1/4 cup of unsweetened cocoa powder
METHOD:
  1. Grate the chocolate into slivers with a knife. Set aside.
  2. Heat the cream to the boiling point; remove from the heat, add the chocolate and stir till the chocolate melts completely. Add the butter and stir to melt. Add the grated lime zest and stir to combine.
  3. Pour into a greased small cube-shaped container. Cover with wrap and store in the fridge for at least 2 hours; remove from the fridge and unmold with a knife; cut into small squares, sprinkle with cocoa powder on all sides and serve.


This post is part of a truffle mania challenge in which some chocolate loving foodies are bringing their own personal touch to truffles on May 30, 2011.


Friday, May 27, 2011

Chocolate, Peanut Butter Cookie Dough

Chocolate, Peanut Butter Cookie Dough, Toasted Marshmallow Cupcakes

IMG_3713

I’m totally a good person to surprise.
If you tell me that you’re stuck in Seattle working all weekend, and you can’t come down for my birthday,  I’ll believe you.  I’ll believe you, because I love you and you’re not a liar.
If you tell me that you’re working away in Phoenix, and you simple can’t get away to celebrate my birthday,  I’ll believe you.  I’ll believe you, because I love you and you’re not a liar.
You’re going out of town to visit our grandparents?  Really?  You have to go this weekend when you knew it was my birthday?  Um… ok.  It must be important.  Go on.  I believe you.  yadda yadda yadda… you’re not a liar.
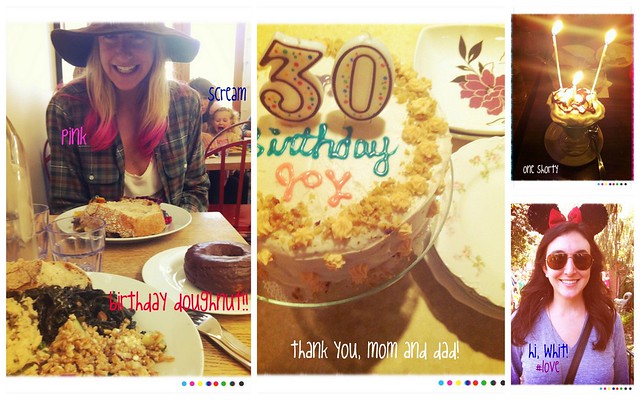
This birthday.  Oh man! I was hit with surprise, after surprise, after surprise.
birthday collage

Surprise!  Jill dyed her hair pink and you’re about to eat that mega doughnut… and why the heck is that kid screaming?
Surprise!  Your sister flew down from Seattle just to drink margaritas with you for the day!  Ps.  I love you, but I didn’t get a good picture of you on your visit down.  Pps.  I’m sorry.
Surprise!  Your mom and dad made you a cake!
Surprise!  Your family isn’t out of town!  They’re taking you to dinner… silly.  And there’s ice cream!
Surprise!  We’re at Disneyland.
Surprise!  Space Mountain is broken. Twice.  …Look at you standing in line like a numb-skull.
Surprise!  A very special boy  flew in from Phoenix to sit on your doorstep with wine and flowers… But… surprise! You didn’t get home until super late… because you’re a work-a-holic… and he was blowing up your phone… but you didn’t know he was on your doorstep or you totally would have gotten home sooner… or you would have at least straightened up your apartment… and done a load of laundry… and washed your hair… and wait,  you really hope you flushed the toilet.

birthday collage

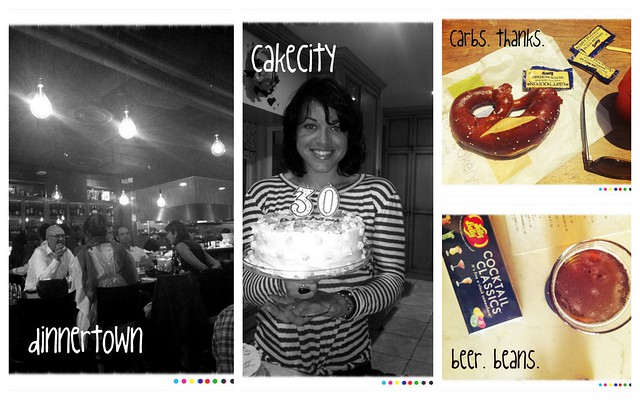
Surprise!  Dinner with friends tastes AWESOME.
Surprise!  Welcome to caketown!
Surprise!  Pretzels!!  Thank you, Grande.
Surprise!  Ethan made you hot dogs out of cake!
Surprise!  Drink this beer and shove all of these jelly beans in your mouth.  Thank you, Melissa!

IMG_1868

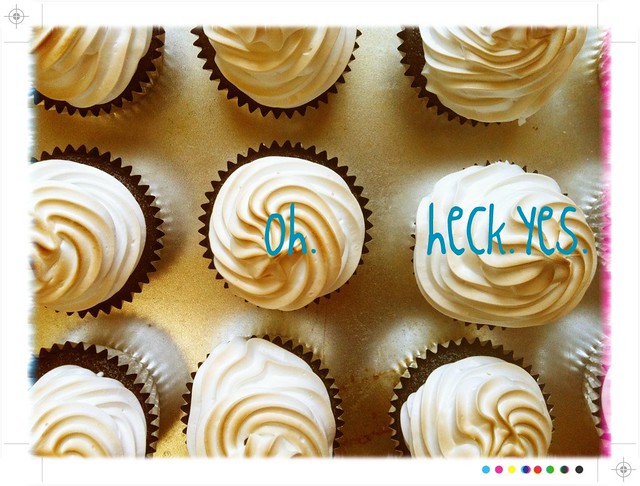
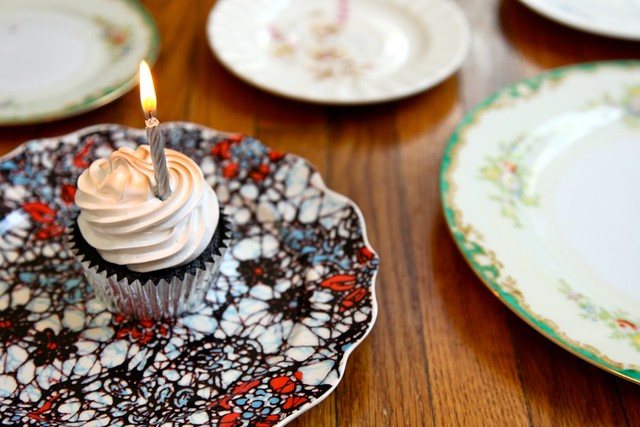
Surprise!  Cupcakes at midnight.
Like… the best/most ridiculous/ stupidly decadent cupcakes… at midnight.

IMG_3706

Allow me to tell you about these cupcakes.  You might want to sit down.  You’re probably already sitting down… unless you’re one of those people that has a standing up desk situation.  You’re the future.  Look at you… showing off and being the future.
These cupcakes are ridiculous.  I apologize.

IMG_3723

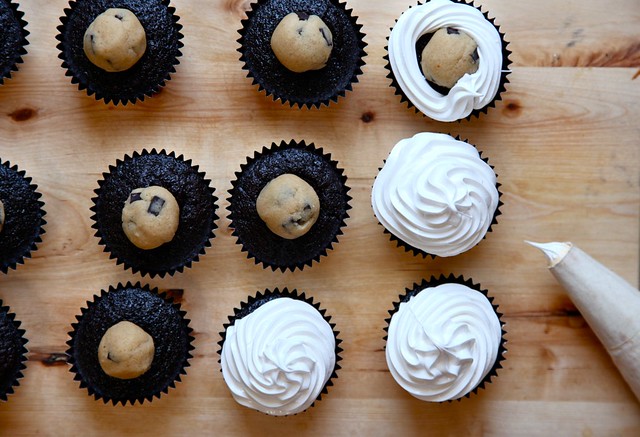
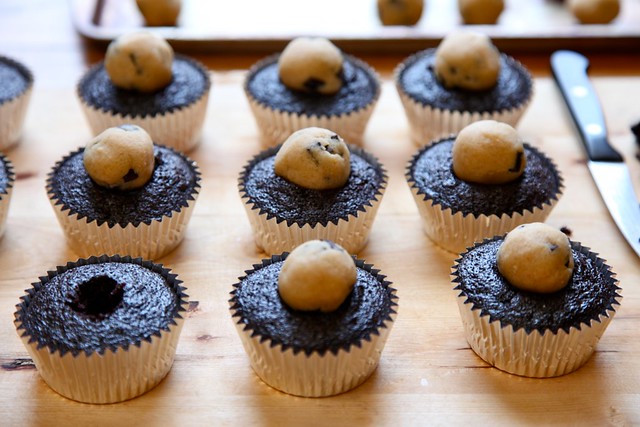
Soft chocolate cupcakes baked up and cooled.
A small hole is carved out of the top of the cupcake.  A walnut sized ball of Peanut Butter Chocolate Chip Cookie dough is placed in the center of the cupcake.
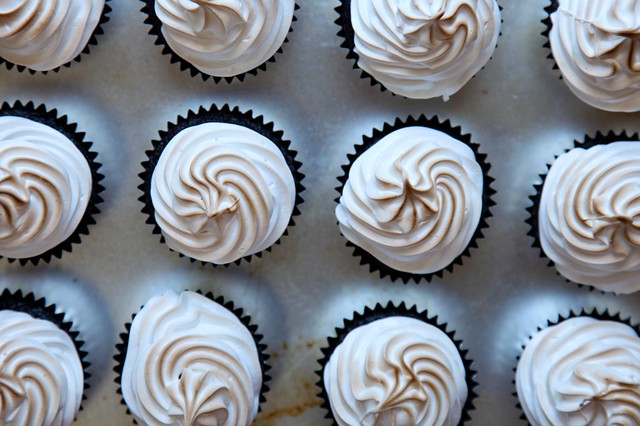
Cupcake is topped with glossy meringue frosting.  Cupcakes are torched under the broiler… toasting the marshmallow frosting.
What I’m trying to tell you is that I’ve made the best cupcake ever.  Cake meets cookie dough meets toasted marshmallows.

IMG_3728

These are, most definitely, special occasion cupcakes.  Don’t go making these, willy-nilly, letting them sit around the house.  You’ll eat them for breakfast.  You’ll eat them at midnight.  You’ll think about them all day long.
Also… if you want to be the most popular person anywhere… bring these.  Take all the credit for the cake/dough/marshmallow combination.  That’s why I do this… to make you look great!
Seriously.

IMG_3764
Thank you to every one of you who came here to wish me a happy birthday.  Really.  From the inside of my heart I thank you, I like you, and I appreciate you.  I feel like we’re friends… because we are.
Chocolate, Peanut Butter Cookie Dough, Toasted Marshmallow Cupcakes
makes 24 cupcakes
cupcakes from Organic and Chic
meringue from Take a Megabite
Print this Recipe!

For the Cupcakes:
(if you don’t want to use all organic ingredients… this recipe will still turn out wonderfully)
2 1/4 cups organic all-purpose flour
2 cups organic cane sugar
1 cup organic unsweetened cocoa powder
2 teaspoons baking soda
1/2 teaspoon salt
1 tablespoon organic vanilla extract
2/3 cup organic canola oil
2 teaspoons organic white vinegar
2 cups cold water

For the Cookie Dough Balls:
1 stick (1/2 cup or 4 ounces) unsalted butter at room temperature
1 cup plus 2 Tablespoons all purpose flour
1/2 teaspoon baking soda (i know we’re not baking them, it’s for flavor)
3/4 teaspoons salt
1/2 cup brown sugar
1/3 cup granulated sugar
1 teaspoon vanilla extract
2-3 tablespoons natural peanut butter (if you have a nut allergy, 2 tablespoons of yogurt will work as a binder as well)
1 cup semi sweet chocolate chips

For the Meringue:
4 large egg whites
1 1/2 cups granulated sugar
1/2 cup light corn syrup
large pinch of salt
2 teaspoons pure vanilla extract

For the Cupcakes:
Preheat oven to 350 degrees F.  Line two cupcake pans with paper liners and set aside.
In a large bowl, sift the dry ingredients together.  Set aside.
In a medium bowl, whisk together the oil, water, vanilla extract and vinegar.
Slowly whisk the wet ingredients into the dry ingredients being careful not to overmix.  The mixture will be quite wet, but that’s ok.
Pour the batter until the cups are two thirds full and place in the oven for 20-24 minutes or until a toothpick inserted into the center of the cup comes out clean.
Cool in the pan for 10 minutes then place on a wire rack until completely cool before topping with cookie dough ball.

For the Cookie Dough Balls:
In the bowl of a stand mixer fit with a paddle attachment (or with a large bowl and a wooden spoon) cream butter and sugars until light and fluffy, about three minutes in the machine.  Beat in peanut butter (or yogurt if using) along with the vanilla extract and stir to combine.
Whisk together the flour, baking soda and salt.  Add all at once to the butter and sugar mixture and stir until incorporated.  Fold in chocolate chips.
Spoon a scant tablespoons size amount of dough in your hand.  Roll into a ball and place on a cookie sheet.  Make 24 little cookie dough balls, and refrigerate until ready to top the cupcakes.

For the Meringue:
In a large pot, bring about 2 inches of water to a simmer.
In a large, heat-proof bowl, whisk together egg whites, sugar, corn syrup and salt.  The mixture will be grainy, because of the sugar.
Place bowl over simmering water and whisk as it heats.  The sugar will dissolve after about 5 minutes.  Keep and eye on the mixture, it shouldn’t get warm enough to cook the eggs.  Yucky.
Transfer the egg white and sugar mixture to the bowl of an electric stand mixer.  With a whisk attachment, beat the egg whites, on high, until stiff peaks form (about 5 minutes)  The mixture will be fluffy and glossy and look like melted marshmallows.  It’ll be sticky too.  Beat in the vanilla extract last.   Cover, and set aside until ready to frost cupcakes.

To Assemble Cupcakes:
Use a small paring knife to cut a 3/4-inch whole out of the top/center of the cupcakes.  Don’t cut the whole center of the cupcake out… just make a little hole for the dough ball to rest without rolling off.
Place dough balls on top of cupcakes.
Place meringue frosting in a pastry bag (or large Ziplock bag) fitted with a medium-large tip.  Use your instincts for the size of the tip.  Any size (star or round) medium tip will do for frosting these cupcakes.  Pipe frosting around the edges of the cupcake and over the dough ball in a circular motion.  Frost all cupcakes.
Turn on oven broiler.  Yea… it’s about to get real.
Place 12 cupcakes on a baking sheet.  Place cupcakes under the broiler for about 1 minute.  Don’t even close the broiler door.  Keep an eye on them as they toast.  You may need to remove the cupcakes and rotate the pan to ensure that they cook evenly.  Once toasted, remove cupcakes, and toast the remaining 12 in the same fashion.
Serve cupcakes!
Cupcakes will last, in an airtight container in the refrigerator, for up to 4 days.  They’re delicious.


Sunday, May 22, 2011

Chocolate Almond Babka

On Food Sunday Chocolate Almond Babka


IMG_0388

Happy Sunday Bread Heads!
There are about as many recipes for Babka as there are stars in the sky, but this one is mine! Babka are almost always twisted or spiraled in their form, allowing the fillings to be layered without actually layering them. This one is an Chocolate Almond Babka with raisins and walnuts. I also bake in cake pans that allows for the unique spiral affect.
There are a lot of steps in this break but it really only takes about 4 hours (including rising and baking time) and none of the steps are particularly hard. So if you want a really special and fairly easy treat for a brunch or tea this is your bread.
Now, let’s bake!

Chocolate Almond Babka:
Ingredients:
For the Sponge:
2 cups all purpose flour
2 packages (4 ½ teaspoons) yeast
½ cup milk
1 ¼ cups hot (120 – 130 degrees) water

For the Dough:
½ cup sugar
1 teaspoon salt
½ cardamom
½ teaspoon vanilla extract
2 eggs
2 egg yolks
3 cups all purpose flour
1 stick (1/2 cup) butter at room temperature.

For Filling:
16 oz almond paste
8 oz bitter sweet chocolate, melted
1 cup raisins, plumped in brandy or water
1 cup roughly chopped walnuts


Baking Pans – 2 8” cake pans greased. If you do not have cake pans this can be baked on sheet pans, but you won’t get as tall a rise.

Method:
To make the sponge, in your large mixing bowl or the work bowl of your stand mixer combine the flour and yeast. Add the hot water and milk and stir vigorously for 2 minutes. Cover the bowl and allow it to foam and double in volume for 2 hours.
Uncover the bowl and stir down the sponge. Add the sugar, salt, cardamom and vanilla. Stir for one minute to make sure all the ingredients are worked into the sponge. Add the eggs and the yolks, one at a time, mixing it in completely before adding the next.
Add 1 ½ cups of flour to the batter. Using the flat paddle attachment or a wooden spoon stir until the flour is all worked into the batter. The batter will get pretty thick at this point, don’t worry.
Cut the butter into 4 pieces. Add them one at time, stirring the dough until all the butter has been worked in (you can not do this is the butter is ice cold!). This method of adding some flour then the butter then more flour gives this bread its nice velvety texture, both when you are kneading it and eating it.
Add the rest of the flour, ¼ at a time. You will now have a soft dough that can be lifted from the bowl. If you are kneading this by hand, turn the dough out onto a well floured work surface and knead gently for 5 minutes. If the dough is sticky, sprinkle it with flour.
If you are kneading this dough with your stand mixer, attach the dough hook and knead it at low for five minutes. If the dough seems sticky (be sure to stop the mixer and check) add some sprinkles of flour.
Place the dough in a greased bowl and cover tightly with plastic wrap. Allow it to rise until it has doubled in volume, about 45 minutes. Now it is time to plump the raisins. In a small sauce pan, combine the raisins and 1 cup of water or brandy. Over low heat bring to a simmer then remove from the heat and allow to stand until the dough has risen. Drain the pan and then turn the raisins out onto a plate covered with a couple of paper towels. You don’t want them to be wet as they will add unwanted moisture to the bread.
Punch the dough down and turn it out onto a lightly floured work surface. Using a sharp knife divide the dough into two halves. Set them aside to rest while you melt the chocolate.
In a microwave safe bowl heat the chocolate for 1 minute at full power. Stir and return the chocolate to the microwave for 20 second increments, stirring each time until all the chocolate is melted. If you don’t have a microwave, place the chocolate in a heat safe bowl and put it over 2” of simmering water in a pot. The bottom of the bowl should not touch the water. Stir until the chocolate is completely melted.
Now it is time to roll out the dough. Take one of the dough balls and roll it out to a 8” by 14” rectangle. It should be about ¼” thick. Spread half of the melted spread half of the melted chocolate evenly over the dough, leaving a 1” boarder all the way around.
It would be ideal to spread the almond paste the same way, but I have never figured out how to do it without making a huge mess. So, instead, take half of the almond paste and pinch off ¼” pieces and spread them evenly over the dough. Sprinkle on half of your raisins and half of your walnuts.
Now you are going to get your hands messy. Press down, gently, on top of the raisins and walnuts. Yes, your hands are going to get some chocolate on them. But trust me you get a much better product out of doing this than not.
Go wash your hands. Dry them very thoroughly. Now starting from one of the long edges tightly roll the dough up. Very tightly pinch the seams and place the dough seam side down on the work surface.
With your rolling pin, very gently roll across the whole length of the cylinder 3 times, to flatten it. Don’t press down on the pin, just let the weight of it to the work.
Let the dough rest for 2 minutes. Then starting at one end twist about 1/5 of the dough three times. Let it rest for a minute. Then go to the next 1/5 and twist it three times. Let it rest and repeat until you have worked your way all the way down the dough. If some of the chocolate breaks through to the surface, don’t panic that is just fine.
When you have a twisted dough, place it in your prepared cake pans or on the sheet pan in a loose spiral. This dough is going to rise a lot, so don’t worry about having it touching in the spiral, leave some space for it to grow.
Repeat with the other dough. Cover both dough’s with wax paper or parchment paper and let rise for 30 minutes.
20 minutes before you bake, set a rack in the middle of the oven and preheat it to 350 degrees.
When the dough is risen slip the pans into the hot oven and bake for 45 minutes. The bread will be dark brown on top when it is done. Remove the pans from the oven and gently turn out the bread. Be careful! These loaves are rather fragile when warm!
Allow to cool completely before cutting. When you do cut into them, you’ll find layers of almond goodness and chocolate, with the raisins and walnuts adding texture to the experience!