best way to burn fat body fat loss burn fat burn fat diet Butter chicken recipes coconut oil coconut oil health counting calories dairy free diet diet plan Eating Organic exercise fast fat loss fat burning exercises fat burning food fat burning foods fat burning workout fat loss tips gluten free healthy dessert recipes healthy eating plan healthy fats Healthy Foods healthy meal ideas healthy meal plan healthy meal plans help me lose weight high cholesterol irritable bowel syndrome lose weight losing weight meal plans metabolism Nutritious Eating organic organic coconut oil saturated fat saturated fats trans fat trans fats weight loss weight loss meal plans wheat free diet workouts
Wednesday, June 22, 2011
The Diet Solution Program - Why Diets Keep You Fat And Prevent Weight Loss
The Diet Solution Program - Why Diets Keep You Fat And Prevent Weight Loss
Sunday, June 19, 2011
Chocolate Chip Coffee Cake
Chocolate Chip Coffee Cake
In my household, Father’s Day has always been about family and simplicity. We kids have grown and left the nest, but we always make it back to River Edge on the third Sunday in June to spend the day with dad. For as long as I can remember, my dad has enjoyed nothing more than a relaxing afternoon with his three daughters and for that we make an extra effort to be all present.
Instead of ties we give hugs, and humorous cards are more welcome than the latest gadget or book about the history of baseball. We know that our appreciation means more to him than anything we could buy, which is why my gift to dad this holiday will be a warm chocolate chip coffee cake baked with love.
I found this recipe while browsing through those addicting food blogs and thought it was perfect for a Sunday brunch. I was right. The second I put this in the oven the entire house was overcome by the delicious smell of brown sugar and cinnamon. What could be more inviting?
I recommend this dish for the upcoming holiday or any get-together you are
hosting. This cake is great for breakfast, as a snack or dessert. Pair it with coffee, tea or a big glass of milk and enjoy.
Tuesday, June 14, 2011
Chocolate Carrot Cake Cupcakes
Chocolate Carrot Cake Cupcakes with Chocolate Cream Cheese Frosting

The mention of carrot cake usually brings up memories of a moist, spicy cake laden with rich and tangy cream cheese frosting – not of chocolate. But just as zucchini can pair well with chocolate in a cake or quick bread, so can shredded carrots. These Chocolate Carrot Cake Cupcakes are a chocolaty variation on my regular carrot cake cupcake recipe. The cupcakes get a good dose of chocolate flavor from cocoa powder that is incorporated into the batter, and the result is a moist cupcake with a hint of spice and a good amount of chocolate in every bite.
This cupcake recipe uses cinnamon, nutmeg and cardamom as its main spices, though they are not strong enough to dominate the chocolate flavor. Cinnamon and nutmeg are found in many carrot cake recipes, while cardamom is a bit less common. Cardamom, however, goes very well with chocolate and draws out some of the natural sweetness of the shredded carrots, so it works out perfectly in this recipe. The cocoa powder (both natural and dutch process will work; I typically use a dutch process cocoa) really does add a lot of chocolate flavor and gives a bittersweet, dark chocolate note. If you want even more chocolate, you can stir in some mini chocolate chips or chopped dark chocolate along with the shredded carrots.
You’ll get plenty of additional chocolate if you top these off with this Chocolate Cream Cheese Frosting, however. It wouldn’t be quite right to have carrot cake without the cream cheese frosting. This chocolaty frosting also has a deep cocoa flavor to it, but it still retains that rich and tangy flavor that a plain cream cheese frosting has. You can opt for a vanilla frosting by omitting the cocoa powder and adding a little bit of extra confectioners’ sugar, too.
Chocolate Carrot Cake Cupcakes with Chocolate Cream Cheese Frosting
1 1/4 cups all purpose flour
1/4 cup unsweetened cocoa powder
1 tsp baking soda
1/2 tsp ground cinnamon
1/2 tsp ground cardamom
1/4 tsp nutmeg, freshly grated
1/4 tsp salt
1 1/4 cups brown sugar
2 large eggs
1/4 cup butter, melted and cooled
1/4 cup milk
1 tsp vanilla extract
1 1/2 cups shredded carrot
1/2 cup mini chocolate chips (optional)
Preheat the oven to 350F. Line a 12 cup muffin pan with paper liners.1 1/4 cups all purpose flour
1/4 cup unsweetened cocoa powder
1 tsp baking soda
1/2 tsp ground cinnamon
1/2 tsp ground cardamom
1/4 tsp nutmeg, freshly grated
1/4 tsp salt
1 1/4 cups brown sugar
2 large eggs
1/4 cup butter, melted and cooled
1/4 cup milk
1 tsp vanilla extract
1 1/2 cups shredded carrot
1/2 cup mini chocolate chips (optional)
In a medium bowl, sift together flour, cocoa powder, baking soda, spices and salt.
In a large bowl, beat together sugar and eggs until smooth. Whisk in melted butter, milk and vanilla extract. Gradually stir in flour mixture until only a few streaks of dry ingredients remain. Stir in shredded carrots and mini chocolate chips, if using, then divide batter evenly into prepared muffin pan.
Bake for 16-18 minutes, until a toothpick inserted into the center comes out clean.
Cool completely on a wire rack before frosting.
Makes 12
Chocolate Cream Cheese Frosting
4 tbsp butter, softened
4-oz cream cheese, softened
1/4 cup unsweetened cocoa powder
2 tbsp milk
1/2 tsp vanilla extract
2 – 2 1/2 cups confectioners’ sugar
Beat together butter and cream cheese in a medium bowl. Beat in cocoa powder, milk and vanilla extract, then gradually blend in the confectioners’ sugar until frosting is thick, creamy and smooth.4 tbsp butter, softened
4-oz cream cheese, softened
1/4 cup unsweetened cocoa powder
2 tbsp milk
1/2 tsp vanilla extract
2 – 2 1/2 cups confectioners’ sugar
If desired, set aside about 1/3 cup of icing before cocoa is added to make mini carrot decorations, as described here.
vegan chocolate cupcakes
vegan chocolate cupcakes with chai buttercream

I’m so glad y’all liked the pictures! I’m pretty convinced Tahoe is one of the most beautiful places on earth. On top of the photos, we also shot a short time lapse video, which I’ll post this afternoon.
But first, let’s talk birthday cake.

I’m blessed that I got to enjoy two! The first one was made by Ashley and was an absolutely diiiiiivine chocolate mint cake. I enjoyed it thoroughly after a small pizza get together with some friends last Thursday night.
The second cake I enjoyed were these cupcakes that I made to take with us to Tahoe. Last week at the yoga studio, I experienced the most divine vegan chocolate cake with chai buttercream from a gluten-free bakery in town and ever since then I’ve been craving another slice of that cake.
So Friday afternoon before we left, I did what any cakeaholic would do on the eve of her 26th year.
I took matters into my own hands.

The chocolate cake hails from a tried and true recipe I’ve been making for years. And for the buttercream, I steeped a very strong (teeny tiny) cup of chai tea to infuse my billowy frosting with. The end result was a creamy, slightly spicy, perfect buttercream that paired wonderfully with the rich chocolate cake.

Ridiculous. I’m shocked they even lasted the car ride up.
Well, I might have eaten one in the car.

And another when we got there.
Vegan Chocolate Cupcakes with Chai Buttercream
makes 10 cupcakes
chocolate cupcake recipe from Vegan Cupcakes Take Over The World <—love
Print this recipe!
Ingredients:
for cupcakes–
1 cup soy milk
1 tsp apple cider vinegar
1/3 cup canola oil
3/4 cup sugar
2 tsp vanilla extract
1 cup all purpose flour
1/3 cup cocoa
1/2 tsp baking powder
3/4 tsp baking soda
1/4 tsp salt
for frosting–
1 stick earth balance buttery spread (1/2 cup)
about 3-4 cups powdered sugar
2 chai teabags
2 T boiling water
2 T soy milk
1/4 tsp cinnamon
Directions:
Preheat oven to 350 degrees. Mix the vinegar with the soy milk and let sit for five minutes.
Whisk together the soy milk/vinegar, canola oil, sugar and vanilla. In another bowl, sift together the dry ingredients. Add wet to dry and mix until combined.
Pour batter into greased cupcake molds and bake for 25 minutes, or until springy. Let cool completely before frosting.
While cupcakes are cooling, beat the earth balance until soft. Brew the tea in the two tablespoons of boiling water and let sit for ten minutes to steep. Then, add the soy milk. Add that mixture, plus the powdered sugar and cinnamon to the earth balance and continue to beat for 10 minutes until very light and fluffy.
Frost cooled cupcakes using this method or with a pastry bag and large star tip.
Enjoy!
Time:
1 hour
Monday, May 30, 2011
Chocolate and Bacon Maple Cupcakes

Downtown Boulder, Colorado has become known for great little eateries, bookstores and coffee houses. In fact, in 2010 the town was deemed the best Foodie town in the US by Bon Appetit Magazine. And considering the town is usually named one of America’s fittest cities by various media publications, many of these local boutique shops and restaurants are organic or health-conscious. Along comes Tee and Cakes, a refreshing and decadent change to compliment the earthy cuisine in Boulder. This shop is for the most sophisticated sweet tooth who has no fear of trying the most unique gourmet desserts. The atmosphere is cheery and as the name suggests, one can even buy a cupcake themed t-shirt while sipping coffee and enjoying cake. One of the owners is a graphic artist who has designed a great selection of “sweet” apparel.
Since its opening, Tee and Cakes has become most famous for its superb selection of cupcakes and custom cakes for special events. The custom cakes are quite simply … works of art. Executive Pastry Chef and owner, Kim Boos delivers stunning designs that are not only whimsical and one-of-a-kind, but taste like heaven. I know this first hand because I always buy my cakes from Tee and Cakes.
But if you really want something special, you must try their famous Chocolate and Bacon Maple Cupcakes. These cupcakes have received regional and national attention as being one of the most unique and decadent cupcakes … ever!! Even Food Network was impressed and featured this recipe on an episode of Unwrapped! So, if you’re ever in Boulder … do yourself a favor and swing by Tee and Cakes. And if not, give this recipe a try and watch even those skeptics who say “bacon and chocolate?” beg you for the recipe.
Chocolate and Bacon Maple Cupcakes
Maple Cake Recipe
- 2 sticks (1 cup) unsalted butter, room temperature, plus more for pans
- 1 1/2 cups all-purpose flour, plus more for pans
- 1 1/2 cups cake flour (not self-rising)
- 1 tablespoon baking powder
- 1/2 teaspoon salt
- 1 3/4 cups sugar
- 4 large eggs
- 1 1/4 cups milk
- 2 T Maple Extract
Preheat oven to 350 degrees. Line the cupcake pans with your choice of cupcake liners. Into a medium bowl, sift together flours, baking powder, and salt; set aside.
In the bowl of an electric mixer fitted with the paddle attachment, beat the butter and sugar until light and fluffy, 3 to 4 minutes, scraping down the sides of the bowl as needed. Beat in eggs, one at a time, then beat in maple extract. With the mixer on low speed, add the flour mixture in three parts, alternating with the milk and beginning and ending with the flour; beat until combined after each addition.
Using a scoop fill the cupcake liners 2/3 full.
Bake until golden and cool.
Ganache Recipe
- 1 pound Semisweet Chocolate chopped or Chocolate Chips
- 2 cups heavy Cream
- Pinch of Salt
When cupcakes have cooled spread some ganache on top. Chill for a minute or two. While chilling cook up some of your favorite bacon however you like it. Brian likes his chewy and Kim likes hers crunchy and toasted.
Chop in pieces and top the cupcakes and … voila!
Chocolate truffles
Chocolate truffles

Chocolate is such a personal thing. I almost feel the same with chocolate as I do with perfume. I would hesitate to offer someone chocolate (as perfume) unless I knew exactly what they liked.
By the way, have you heard of Le Whif? The idea here is to sniff chocolate scent, getting a high from it minus the calories.
In any case, this is made with Callebaud, which is my favorite maker with a touch of lime zest.
INGREDIENTS: For 8 truffles (can double or triple the recipe)
- 2 ounces of whipping cream
- 100 g. or 3.4 ounces of Callebaud dark semi-sweet
- 1 Tablespoon of unsalted butter
- Zest of half a lime
- 1/4 cup of unsweetened cocoa powder
- Grate the chocolate into slivers with a knife. Set aside.
- Heat the cream to the boiling point; remove from the heat, add the chocolate and stir till the chocolate melts completely. Add the butter and stir to melt. Add the grated lime zest and stir to combine.
- Pour into a greased small cube-shaped container. Cover with wrap and store in the fridge for at least 2 hours; remove from the fridge and unmold with a knife; cut into small squares, sprinkle with cocoa powder on all sides and serve.

This post is part of a truffle mania challenge in which some chocolate loving foodies are bringing their own personal touch to truffles on May 30, 2011.
Friday, May 27, 2011
Chocolate, Peanut Butter Cookie Dough
Chocolate, Peanut Butter Cookie Dough, Toasted Marshmallow Cupcakes
I’m totally a good person to surprise.
If you tell me that you’re stuck in Seattle working all weekend, and you can’t come down for my birthday, I’ll believe you. I’ll believe you, because I love you and you’re not a liar.
If you tell me that you’re working away in Phoenix, and you simple can’t get away to celebrate my birthday, I’ll believe you. I’ll believe you, because I love you and you’re not a liar.
You’re going out of town to visit our grandparents? Really? You have to go this weekend when you knew it was my birthday? Um… ok. It must be important. Go on. I believe you. yadda yadda yadda… you’re not a liar.
This birthday. Oh man! I was hit with surprise, after surprise, after surprise.
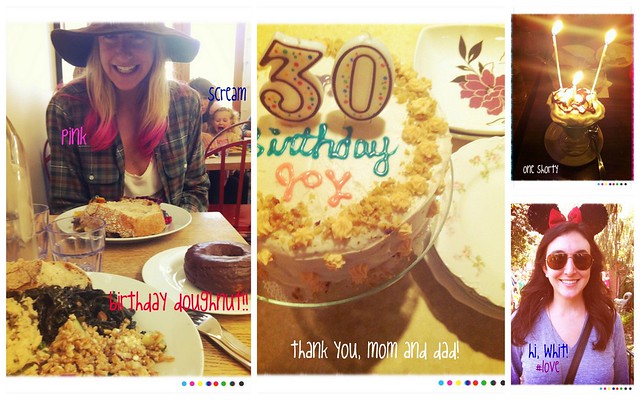
Surprise! Jill dyed her hair pink and you’re about to eat that mega doughnut… and why the heck is that kid screaming?
Surprise! Your sister flew down from Seattle just to drink margaritas with you for the day! Ps. I love you, but I didn’t get a good picture of you on your visit down. Pps. I’m sorry.
Surprise! Your mom and dad made you a cake!
Surprise! Your family isn’t out of town! They’re taking you to dinner… silly. And there’s ice cream!
Surprise! We’re at Disneyland.
Surprise! Space Mountain is broken. Twice. …Look at you standing in line like a numb-skull.
Surprise! A very special boy flew in from Phoenix to sit on your doorstep with wine and flowers… But… surprise! You didn’t get home until super late… because you’re a work-a-holic… and he was blowing up your phone… but you didn’t know he was on your doorstep or you totally would have gotten home sooner… or you would have at least straightened up your apartment… and done a load of laundry… and washed your hair… and wait, you really hope you flushed the toilet.
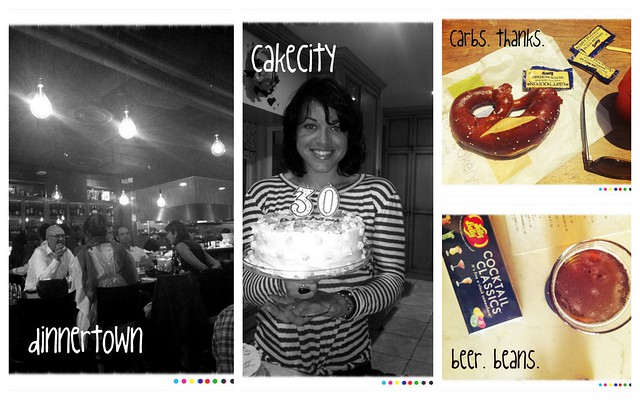
Surprise! Dinner with friends tastes AWESOME.
Surprise! Welcome to caketown!
Surprise! Pretzels!! Thank you, Grande.
Surprise! Ethan made you hot dogs out of cake!
Surprise! Drink this beer and shove all of these jelly beans in your mouth. Thank you, Melissa!
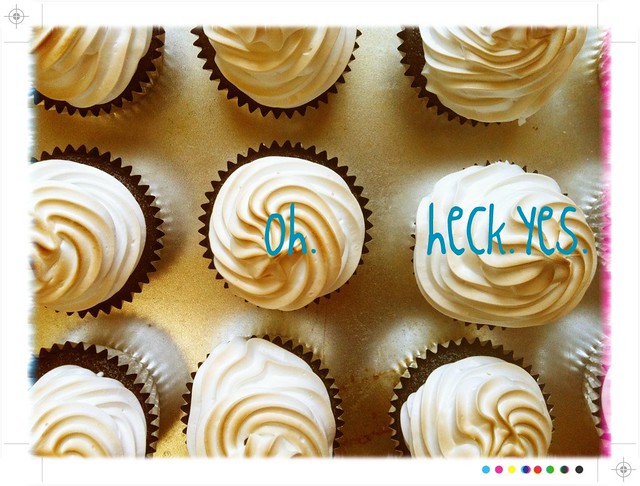
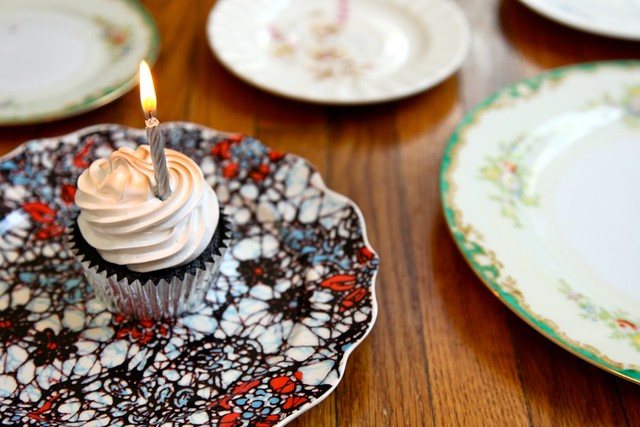
Surprise! Cupcakes at midnight.
Like… the best/most ridiculous/ stupidly decadent cupcakes… at midnight.
Allow me to tell you about these cupcakes. You might want to sit down. You’re probably already sitting down… unless you’re one of those people that has a standing up desk situation. You’re the future. Look at you… showing off and being the future.
These cupcakes are ridiculous. I apologize.

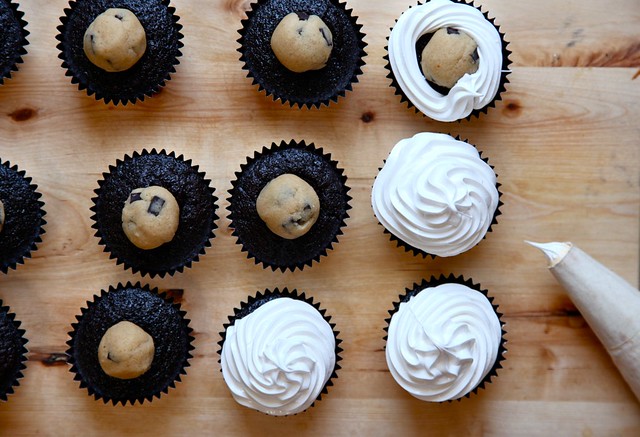
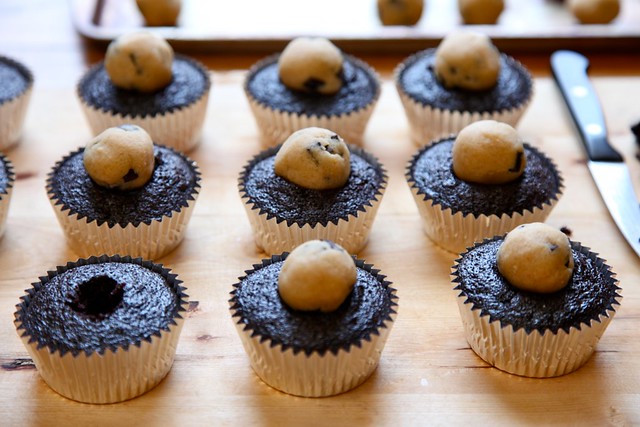
Soft chocolate cupcakes baked up and cooled.
A small hole is carved out of the top of the cupcake. A walnut sized ball of Peanut Butter Chocolate Chip Cookie dough is placed in the center of the cupcake.
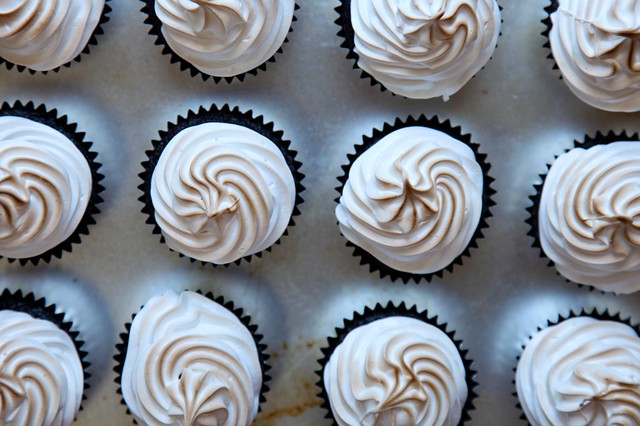
Cupcake is topped with glossy meringue frosting. Cupcakes are torched under the broiler… toasting the marshmallow frosting.
What I’m trying to tell you is that I’ve made the best cupcake ever. Cake meets cookie dough meets toasted marshmallows.
These are, most definitely, special occasion cupcakes. Don’t go making these, willy-nilly, letting them sit around the house. You’ll eat them for breakfast. You’ll eat them at midnight. You’ll think about them all day long.
Also… if you want to be the most popular person anywhere… bring these. Take all the credit for the cake/dough/marshmallow combination. That’s why I do this… to make you look great!
Seriously.
Thank you to every one of you who came here to wish me a happy birthday. Really. From the inside of my heart I thank you, I like you, and I appreciate you. I feel like we’re friends… because we are.Chocolate, Peanut Butter Cookie Dough, Toasted Marshmallow Cupcakes
makes 24 cupcakes
cupcakes from Organic and Chic
meringue from Take a Megabite
Print this Recipe!
For the Cupcakes:
(if you don’t want to use all organic ingredients… this recipe will still turn out wonderfully)
2 1/4 cups organic all-purpose flour
2 cups organic cane sugar
1 cup organic unsweetened cocoa powder
2 teaspoons baking soda
1/2 teaspoon salt
1 tablespoon organic vanilla extract
2/3 cup organic canola oil
2 teaspoons organic white vinegar
2 cups cold water
For the Cookie Dough Balls:
1 stick (1/2 cup or 4 ounces) unsalted butter at room temperature
1 cup plus 2 Tablespoons all purpose flour
1/2 teaspoon baking soda (i know we’re not baking them, it’s for flavor)
3/4 teaspoons salt
1/2 cup brown sugar
1/3 cup granulated sugar
1 teaspoon vanilla extract
2-3 tablespoons natural peanut butter (if you have a nut allergy, 2 tablespoons of yogurt will work as a binder as well)
1 cup semi sweet chocolate chips
For the Meringue:
4 large egg whites
1 1/2 cups granulated sugar
1/2 cup light corn syrup
large pinch of salt
2 teaspoons pure vanilla extract
For the Cupcakes:
Preheat oven to 350 degrees F. Line two cupcake pans with paper liners and set aside.
In a large bowl, sift the dry ingredients together. Set aside.
In a medium bowl, whisk together the oil, water, vanilla extract and vinegar.
Slowly whisk the wet ingredients into the dry ingredients being careful not to overmix. The mixture will be quite wet, but that’s ok.
Pour the batter until the cups are two thirds full and place in the oven for 20-24 minutes or until a toothpick inserted into the center of the cup comes out clean.
Cool in the pan for 10 minutes then place on a wire rack until completely cool before topping with cookie dough ball.
For the Cookie Dough Balls:
In the bowl of a stand mixer fit with a paddle attachment (or with a large bowl and a wooden spoon) cream butter and sugars until light and fluffy, about three minutes in the machine. Beat in peanut butter (or yogurt if using) along with the vanilla extract and stir to combine.
Whisk together the flour, baking soda and salt. Add all at once to the butter and sugar mixture and stir until incorporated. Fold in chocolate chips.
Spoon a scant tablespoons size amount of dough in your hand. Roll into a ball and place on a cookie sheet. Make 24 little cookie dough balls, and refrigerate until ready to top the cupcakes.
For the Meringue:
In a large pot, bring about 2 inches of water to a simmer.
In a large, heat-proof bowl, whisk together egg whites, sugar, corn syrup and salt. The mixture will be grainy, because of the sugar.
Place bowl over simmering water and whisk as it heats. The sugar will dissolve after about 5 minutes. Keep and eye on the mixture, it shouldn’t get warm enough to cook the eggs. Yucky.
Transfer the egg white and sugar mixture to the bowl of an electric stand mixer. With a whisk attachment, beat the egg whites, on high, until stiff peaks form (about 5 minutes) The mixture will be fluffy and glossy and look like melted marshmallows. It’ll be sticky too. Beat in the vanilla extract last. Cover, and set aside until ready to frost cupcakes.
To Assemble Cupcakes:
Use a small paring knife to cut a 3/4-inch whole out of the top/center of the cupcakes. Don’t cut the whole center of the cupcake out… just make a little hole for the dough ball to rest without rolling off.
Place dough balls on top of cupcakes.
Place meringue frosting in a pastry bag (or large Ziplock bag) fitted with a medium-large tip. Use your instincts for the size of the tip. Any size (star or round) medium tip will do for frosting these cupcakes. Pipe frosting around the edges of the cupcake and over the dough ball in a circular motion. Frost all cupcakes.
Turn on oven broiler. Yea… it’s about to get real.
Place 12 cupcakes on a baking sheet. Place cupcakes under the broiler for about 1 minute. Don’t even close the broiler door. Keep an eye on them as they toast. You may need to remove the cupcakes and rotate the pan to ensure that they cook evenly. Once toasted, remove cupcakes, and toast the remaining 12 in the same fashion.
Serve cupcakes!
Cupcakes will last, in an airtight container in the refrigerator, for up to 4 days. They’re delicious.
Sunday, May 22, 2011
Chocolate Almond Babka
On Food Sunday Chocolate Almond Babka
Happy Sunday Bread Heads!
There are about as many recipes for Babka as there are stars in the sky, but this one is mine! Babka are almost always twisted or spiraled in their form, allowing the fillings to be layered without actually layering them. This one is an Chocolate Almond Babka with raisins and walnuts. I also bake in cake pans that allows for the unique spiral affect.
There are a lot of steps in this break but it really only takes about 4 hours (including rising and baking time) and none of the steps are particularly hard. So if you want a really special and fairly easy treat for a brunch or tea this is your bread.
Now, let’s bake!
Chocolate Almond Babka:
Ingredients:
For the Sponge:
2 cups all purpose flour
2 packages (4 ½ teaspoons) yeast
½ cup milk
1 ¼ cups hot (120 – 130 degrees) water
For the Dough:
½ cup sugar
1 teaspoon salt
½ cardamom
½ teaspoon vanilla extract
2 eggs
2 egg yolks
3 cups all purpose flour
1 stick (1/2 cup) butter at room temperature.
For Filling:
16 oz almond paste
8 oz bitter sweet chocolate, melted
1 cup raisins, plumped in brandy or water
1 cup roughly chopped walnuts
Baking Pans – 2 8” cake pans greased. If you do not have cake pans this can be baked on sheet pans, but you won’t get as tall a rise.
Method:
To make the sponge, in your large mixing bowl or the work bowl of your stand mixer combine the flour and yeast. Add the hot water and milk and stir vigorously for 2 minutes. Cover the bowl and allow it to foam and double in volume for 2 hours.
Uncover the bowl and stir down the sponge. Add the sugar, salt, cardamom and vanilla. Stir for one minute to make sure all the ingredients are worked into the sponge. Add the eggs and the yolks, one at a time, mixing it in completely before adding the next.
Add 1 ½ cups of flour to the batter. Using the flat paddle attachment or a wooden spoon stir until the flour is all worked into the batter. The batter will get pretty thick at this point, don’t worry.
Cut the butter into 4 pieces. Add them one at time, stirring the dough until all the butter has been worked in (you can not do this is the butter is ice cold!). This method of adding some flour then the butter then more flour gives this bread its nice velvety texture, both when you are kneading it and eating it.
Add the rest of the flour, ¼ at a time. You will now have a soft dough that can be lifted from the bowl. If you are kneading this by hand, turn the dough out onto a well floured work surface and knead gently for 5 minutes. If the dough is sticky, sprinkle it with flour.
If you are kneading this dough with your stand mixer, attach the dough hook and knead it at low for five minutes. If the dough seems sticky (be sure to stop the mixer and check) add some sprinkles of flour.
Place the dough in a greased bowl and cover tightly with plastic wrap. Allow it to rise until it has doubled in volume, about 45 minutes. Now it is time to plump the raisins. In a small sauce pan, combine the raisins and 1 cup of water or brandy. Over low heat bring to a simmer then remove from the heat and allow to stand until the dough has risen. Drain the pan and then turn the raisins out onto a plate covered with a couple of paper towels. You don’t want them to be wet as they will add unwanted moisture to the bread.
Punch the dough down and turn it out onto a lightly floured work surface. Using a sharp knife divide the dough into two halves. Set them aside to rest while you melt the chocolate.
In a microwave safe bowl heat the chocolate for 1 minute at full power. Stir and return the chocolate to the microwave for 20 second increments, stirring each time until all the chocolate is melted. If you don’t have a microwave, place the chocolate in a heat safe bowl and put it over 2” of simmering water in a pot. The bottom of the bowl should not touch the water. Stir until the chocolate is completely melted.
Now it is time to roll out the dough. Take one of the dough balls and roll it out to a 8” by 14” rectangle. It should be about ¼” thick. Spread half of the melted spread half of the melted chocolate evenly over the dough, leaving a 1” boarder all the way around.
It would be ideal to spread the almond paste the same way, but I have never figured out how to do it without making a huge mess. So, instead, take half of the almond paste and pinch off ¼” pieces and spread them evenly over the dough. Sprinkle on half of your raisins and half of your walnuts.
Now you are going to get your hands messy. Press down, gently, on top of the raisins and walnuts. Yes, your hands are going to get some chocolate on them. But trust me you get a much better product out of doing this than not.
Go wash your hands. Dry them very thoroughly. Now starting from one of the long edges tightly roll the dough up. Very tightly pinch the seams and place the dough seam side down on the work surface.
With your rolling pin, very gently roll across the whole length of the cylinder 3 times, to flatten it. Don’t press down on the pin, just let the weight of it to the work.
Let the dough rest for 2 minutes. Then starting at one end twist about 1/5 of the dough three times. Let it rest for a minute. Then go to the next 1/5 and twist it three times. Let it rest and repeat until you have worked your way all the way down the dough. If some of the chocolate breaks through to the surface, don’t panic that is just fine.
When you have a twisted dough, place it in your prepared cake pans or on the sheet pan in a loose spiral. This dough is going to rise a lot, so don’t worry about having it touching in the spiral, leave some space for it to grow.
Repeat with the other dough. Cover both dough’s with wax paper or parchment paper and let rise for 30 minutes.
20 minutes before you bake, set a rack in the middle of the oven and preheat it to 350 degrees.
When the dough is risen slip the pans into the hot oven and bake for 45 minutes. The bread will be dark brown on top when it is done. Remove the pans from the oven and gently turn out the bread. Be careful! These loaves are rather fragile when warm!
Allow to cool completely before cutting. When you do cut into them, you’ll find layers of almond goodness and chocolate, with the raisins and walnuts adding texture to the experience!
Wednesday, April 13, 2011
Chocolate Swirled
Chocolate Swirled Cannoli Cake

Cannoli in a cake form? If you have ever had fresh cannoli you will know why this cake intrigued me. I have had good cannoli and I have had great cannoli! Just thinking about the great cannoli has my mouth-watering. Did you know that grocery store bakeries now carry ready-made cannoli shells? Need a fancy dessert to make in mintues….cannoli is the way to go! Simply make the frosting as listed below and place in a ziplock bag, snip a corner and pipe into premade cannoli shells.

The author of this cookbook is famous for taking store ingredients and turning them into new and different taste sensations. Did you know that 90% of home cooks when baking a cake use a mix? So it is genius that she takes those same mixes but with some simple additions can turn a cake into a show stopper. How about a homemade wedding cake? Her first book almost 10 years ago was a smashing hit. Taking a box mix and just adding some love to it will yield amazing results! Remember the Oreo Cupcakes I made? This was from her cupcake cookbook. Fun cookbook to try to expand your cake making skills. Think about finding a signature cake for each member of your family to celebrate those special milestones!
The Ruling: You must wait for the cake to cool before frosting it…..I didn’t. You also need to use mini chips….we had regular chips. I loved the cake. But what I loved the most was the frosting. Give me a couple of spoonfuls of that and I am a happy girl!
Chocolate Swirled Cannoli Cake
Ingredients:
- Vegetable oil spray, for misting the pans
- Flour, for dusting the pans
- 1 package (18.25 ounces) plain yellow or vanilla cake mix
- 1¼ cups milk
- ½ cup vegetable oil
- 4 large eggs
- 1 teaspoon pure almond extract
- ½ cup (3 ounces) miniature semisweet chocolate chips
- 1 tablespoon unsweetened cocoa powder
- 1 container (15 ounces) part-skim ricotta cheese
- ¼ cup confectioners’ sugar, or more to taste, sifted
- 1 container (8 ounces) frozen whipped topping, thawed
- 1 teaspoon pure vanilla extract
- ¼ teaspoon ground cinnamon
- ½ cup (3 ounces) miniature semisweet chocolate chips
- Dusting of ground cinnamon
- Dusting of unsweetened cocoa powder
- Candied orange zest
- Make the cake: Place a rack in the center of the oven and pre-heat the oven to 350 degrees F. Lightly mist two 9-inch round cake pans with vegetable oil spray, then dust them with flour. Shake out the excess flour and set the pans aside.
- Place the cake mix, milk, oil, eggs and almond extract in a large mixing bowl and beat with an electric mixer on low speed until the ingredients come together, 30 seconds. Stop the machine and scrape down the side of the bowl with a rubber spatula. Increase the mixer speed to medium and beat until the batter is smooth and thickened, 1½ minutes longer, scraping down the side of the bowl again if needed. The batter should look smooth and thick.
- Measure out 1 cup of cake batter and place it in a small bowl. Stir in the ½ cup of chocolate chips and cocoa powder. Divide the remaining cake batter evenly between the 2 prepared cake pans, smoothing the tops with the rubber spatula. Drop the chocolate cake batter by teaspoonfuls over the batter in both pans. Using a dinner knife, swirl the chocolate batter through the plain batter to marble it. Take care not to scrape the bottom of the pans. Place the pans in the oven side by side.
- Bake the cake layers until the tops spring back when lightly pressed with a finger, 28 to 32 minutes. Transfer the cake pans to wire racks and let the cake layers cool for 5 to 10 minutes.
- Meanwhile, make the frosting: Place the ricotta cheese, confectioners’ sugar, whipped topping, vanilla, and cinnamon in a large mixing bowl and beat with an electric mixer on low speed until just combined, 15 seconds. Taste for sweetness, adding more confectioners’ sugar if necessary. Using a rubber spatula, fold in the ½ cup of chocolate chips. Refrigerate the frosting until it is time to assemble the cake.
- Run a sharp knife around the edge of each cake layer and give the pans a good shake to loosen the cakes. Invert each layer onto a wire rack, then invert it again onto another rack so that the cakes are right side up. Let the layers cool completely, 15 minutes longer.
- To assemble the cake, transfer one layer, right side up, to a cake plate. Spread the top with some of the frosting. Place the second layer, right side up on top of the first and generously frost the top. Working with smooth, clean strokes, spread the remaining frosting over the side of the cake. Garnish the cake with a sprinkling of cinnamon or cocoa powder or with the candied orange zest.
Chocolate French Silk Cake
Oreo and Chocolate French Silk Cake
Oreo and Chocolate French Silk Pie Cake ~ It’s a cake, it’s a pie . . . it’s both. This is a low fat Chocolate French Silk Pie sculpted into a cake and layered with an Oreo whip cream layer.
Oreo and Chocolate Silk French Cake
I know I’m taking a lot of liberties here with a classic, but let’s call it a personal riff. I’ve replaced the chocolate and butter with chocolate and milk in a pudding form. Not necessarily for a lower calorie count, but hey, it can’t hurt with bikini season in a month or two.

Actually, I lightened up the whole pie turned cake for textural reasons, especially since the Oreo layer is Cool Whip. Yes, I could have made my own whipped cream and I do many times, but for this I wanted Cool Whip. There’s just something about Cool whip that reminds me of being a kid.
In fact I wanted the whole nostalgic feeling of having a kid dessert-chocolate pudding and Cool Whip, but dressed in adult sophistication. If you know me or if you’re a regular reader, you know I didn’t grow up with many desserts. A dessert like this one was something that was either a once-in-awhile treat or something I enjoyed at a friend’s home.
So of course now it seems that I’m trying to right that wrong my parents inflicted on my sweet tooth. And this cake did some serious make-up!
A few notes:
- If you prefer, this can just as easily be made in a 9inch pie pan. If you would like to make it as it appears in the picture, I used a 3×6 springform pan because I wanted a tall cake like appearance.
- This can be fully assembled the one day ahead of time.
- For a step-by-step picture tutorial to making the homemade chocolate pudding portion click here.
- I assembled mine and then actually froze it overnight and moved it to the refrigerator 2 hours prior to serving for a firmer texture. This gave the Oreo and Chocolate French Silk Pie Cake an almost ice cream cake like texture.
Oreo and Chocolate French Silk Pie Cake
Makes one 3×6 cake or 9in pie panOreo Crust
- 24 Oreo cookies, crushed
- 4 tablespoons unsalted butter, melted
- Place Oreos in a food processor or blender and pulse until cookies are finely crumbed. Alternatively, place Oreos in a plastic bag and crush with a rolling pin. Set aside 1/3 cup for the Oreo Cool Whip layer. Mix remaining portion with the melted butter and then firmly press crumbs into place to create a crust. Bake crust at 350 degrees F for 7-10 minutes.
*For a step-by-step picture tutorial click here.
- 1/3 cup cornstarch
- ½ cup granulated sugar
- Pinch of salt
- 3 cups cold whole milk
- 3/4 cups dark chocolate, chopped
- 1 tablespoon vanilla extract
- Combine cornstarch, sugar, salt and milk in a blender or food processor and pulse until well blended. Alternatively, combine all ingredients in a bowl and whisk vigorously. Transfer mixture to a heat proof bowl and place over (not on) simmering water for approximately 15-20 minutes, stirring occasionally. Pudding is ready when mixture coats the back of the spoon. Add chocolate stir to combine. Add vanilla and stir to combine.
- 2 ¼ cup Cool Whip
- 1/3 cup crushed Oreos
- Place Cool Whip and crushed Oreos in a bowl and mix to combine.
- Pour chocolate pudding over the Oreo crust. Pour Oreo Cool Whip layer on top of the chocolate pudding. Finish cake to decorating preference. Refrigerate for at least 2 hours or overnight.
Wednesday, April 6, 2011
Chocolate, Dipped Peeps on a Stick
Chocolate-Dipped Peeps on a Stick


It’s that time of year where fluffy marshmallow bunnies and chicks covered in brightly-colored sugar are everywhere. It’s almost like an invasion: Attack of the Peeps.
So, we dipped the little wabbits in a bit of dark chocolate and had instantly made our very own chocolate-marshmallow treats. Add a stick and the kids will think they won the jackpot.

Chocolate-Dipped Peeps on a Stick
12 Bunny-Shaped Peeps
6 ounces melting chocolate
12 paper sticks
sprinkles, if desired
Cut Peeps apart and freeze. This will make the chocolate-dipping easier. In a double boiler over low heat, melt the chocolate until smooth. Take frozen Peeps from freezer and insert sticks at least halfway up the body. Dip into melted chocolate. Allow to drip and then place on parchment and sprinkle with colored sprinkles, if desired. Eat once set.
Makes 12 Peeps pops.
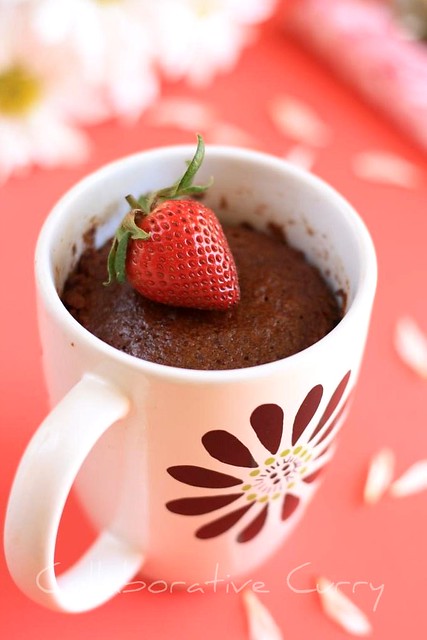
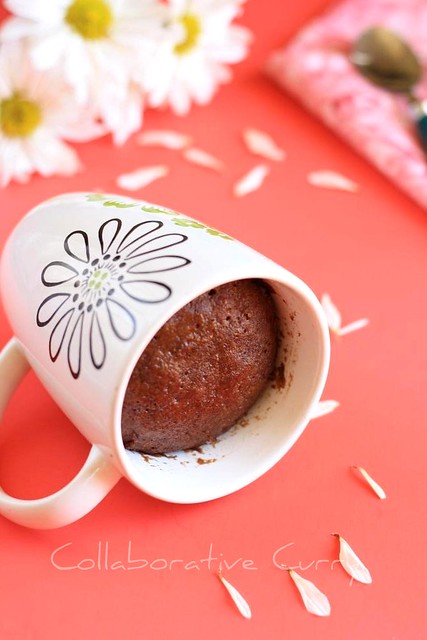
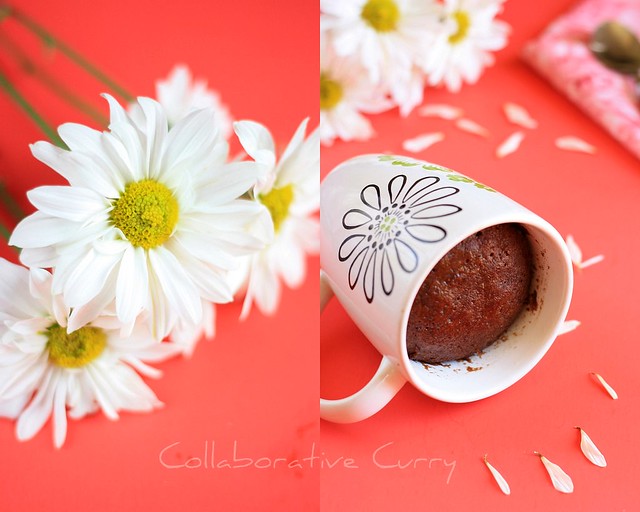
Chocolate Cake
Chocolate Cake in a Mug
You must be familiar with ‘chocolate-cake-in-a-mug’ having already been featured in umpteen blogs and sites. It is delicious and comes together quickly which is great!. After having baked brownies over the weekend I didn’t need any more cakes, but then India won the Cricket World Cup. It’s not everyday that this happens and you will agree that calls for celebration, right? If you have been following this blog or know me personally, you also know I am an ardent fan of cricket. I have been on cloud nine ever since Saturday when India won the World Cup after a long gap of 28 years. I don't even remember the 1983 world cup, when we last won the cup. It was considered a miracle of sorts at that time, and people even today fondly remember and narrate how Kapil Dev (then captain of the Indian team) and his army brought home the cup. Surely I need to celebrate this win.
The match played on Saturday was tough. The Sri Lankan team has seasoned players and is great on the field. The Indian cricket captain, Dhoni, and his team fought hard to win this game. And the victory was sweet.
We needed this break.

So here is chocolate goodness for TEAM INDIA ! Oh! How my heart swells with pride :)
A special thanks to all my friends on Facebook. I want to especially share this virtual treat with you for watching the match and sharing the emotions via FB.
Happy Ugadi!
Ingredients:
All purpose flour- 5 Tbsp
Granulated sugar- 5 Tbsp
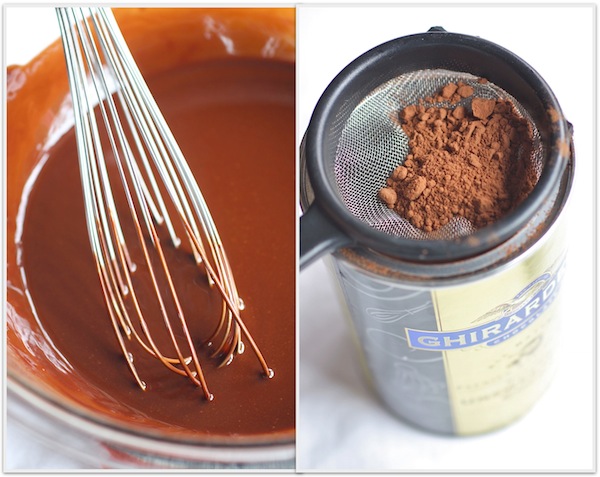
Cocoa- 2 Tbsp
Salt- a pinch
Baking powder- 1/4 to 1/2 tsp
Egg- 1 large
Milk- 4 Tbsp
Vegetable oil- 4 Tbsp
Pure vanilla extract- a dash
2 microwave-safe coffee mugs
Method:
1. Mix all the dry ingredients in a coffee mug to make the cake.
2. Beat the eggs slightly in a small mixing bowl and add the rest of the wet ingredients and mix well with a fork.
3. Add in the dry mixture and mix well.
4. Pour out half of the batter into each coffee mug.
5. Microwave the coffee mugs,one at a time, half- filled with the batter, on high, for a minute. If it does not get done in a minute, keep for another 20-30 seconds. Do not overcook, you might end up with a dry cake. (I kept it for 1 minute and 20seconds)
6. Let it cool and dig in.
7. It will be wonderful if you can top with vanilla ice cream
Notes:
1.The baking powder makes it less dense and more soft when compared to the original recipe.(thanks for the idea "not quite Nigellla" !)
2.The top of the cake looks a bit gooey when you take it out from the microwave after a minute. But it will be done already and do not over cook.
3.If you living in a place which is at sea level you could add a little more baking powder.
4.The cake rises up while cooking, but when you take it out it comes down. So a tall mug/microwave safe utensil is recommended.
5.The original recipe calls for 4 Tbsp each of flour and sugar and 3 Tbsp each of oil and milk. When I made it I added the above amount by mistake and it turned out to be better than the original .(later I tried once with the original measurements too !)
Warm Chocolate Cakes
Warm Chocolate Cakes with Toasted Marshmallow Meringue
Wow, that sounds complicated, doesn't it? Actually, this rich dessert isn't that hard to make. If you've never made marshmallow meringue before, you are in for a real treat. It's easy, insanely delicious and a has a real "wow" factor.
I've made these cakes many times and they are supposed to be served unmolded, upside down on a plate. Because they are so gooey on the inside, sometimes they fall apart a bit after unmolding. I just quit messing with that step and I just serve them now in the ramekins, but you can certainly unmold them if you want. If you don't unmold them, you can pipe the marshmallow right on top, which I prefer.
The recipe for the chocolate cakes requires some egg yolks and because you will have leftover egg whites the marshmallow is the perfect way to use them up.

for a printable recipe, click here
cake adapted from Jean-Georges Vongerichte
makes at least 8 cakes - the recipe can be easily halved
1 cup butter, plus more to butter the molds
8 ounces bittersweet chocolate
4 eggs
4 egg yolks
1/2 cup sugar
8 teaspoons flour
unsweetened cocoa powder, for dusting

While that's heating, beat together the eggs, yolks, and sugar with a whisk or electric beater until light and thick, several minutes.
Pour in the egg mixture into the chocolate/butter mixture and then quickly beat in the flour, just until combined.
Butter and lightly dust with some of the cocoa powder eight 4-ounce molds, custard cups, or ramekins. Divide the batter among the molds. (At this point you can refrigerate the desserts until you are ready to eat, for up to several hours; bring them back to room temperature before baking.)
Preheat the oven to 450 degrees. Bake the molds on a tray for 10 minutes; the center will still be quite soft, but the sides will be set. Remove from oven. Set the oven to "broil".
Pipe the Marshmallow Meringue on the top of each cake. (If you don't have a pastry bag and tip, just use a gallon size zip lock with a corner cut off). Return to oven and broil just until tops are toasted - watch carefully so they don't burn.
Optional: Skip the marshmallow and invert each mold onto a plate and let sit for about 10 seconds. Unmold by lifting up one corner of the mold; the cake will fall out onto the plate. Serve immediately.
Marshmallow Meringue(You will need a cooking thermometer for this recipe)
Note: this recipe contains raw eggs
4 egg whites
1 cup sugar
a large pinch of cream of tartar
Chocolate Hersey
Hershey has more than just chocolate

The ninth hole of the Links Course at Hershey Country Club
THE HOTEL HERSHEY
• 717-533-2171
• The Hershey Golf Collection Package, which includes unlimited golf on all four courses, starts at $432 per night for singles, $588 for double occupancy.
So, the summit: As families are wont to do, we scrambled out the door to the Hersheypark amusement park, leaving our room disheveled. The park was a revelation. Dominating the view from the hotel on high, the place looks huge; once there, it’s bigger. I can only imagine what all those wild rides, all those bells and whistles, all those people looked like through the eyes of my 3-year-old son, Ike, though their saucer-like wonder from atop the Ferris wheel gave a good hint. (His analysis of Storm Runner, which launches riders from 0 to 72 mph in about two seconds, was clear-headed enough: “That’s so crazy.”)
We returned to a room that, never mind spotless, featured a diorama-like scene of Ike’s three favorite stuffed animals arranged in a circle on the pillows at the head of the bed, as if engaged in a powwow, and as charming as a Macy’s Christmas window display. Bravo, whoever you are, and indicative of a wonderfully friendly service attitude across the board.

The former, built in 1930, hosted the 1940 PGA Championship (won by Byron Nelson) and an LPGA event, the Lady Keystone Open, for almost two decades. Whatever one’s feelings about “signature holes,” the West undoubtedly has one hole that will remain in the mind’s eye when the rest have faded. The fifth hole is a 176-yard par 3 whose green is the front lawn of High Point Mansion, Milton Hershey’s stately limestone estate. That I chose this moment to hit my only well-struck iron of the day perhaps shows that great holes can inspire.
Much of the rest of the front nine is as narrow as a Twizzlers twist, with rough as tough as one, too.
Two consecutive narrow little par 4s, Nos. 3 and 4, are especially capable of yielding big numbers. The back nine lets out the waist a bit, making for a retro-feeling loop that retains sufficient modern-day relevance.
George Fazio designed the East course, opened in 1969, and it also has two nines with distinct personalities. The front features one uphill approach shot after another – not a side to engender candy metaphors. It’s both rugged and oddball. The inward half proves more varied and graceful. Taken together, it was a tough test for Nationwide Tour pros when the Reese’s Cup Classic came to town (1997-2004), and it’s solid enough to keep the country club members engaged with just enough of a fun quotient to fulfill its resort function well.

One of the most fun rounds imaginable took place at nine-hole Spring Creek, known as “the Juvenile Golf Club” when it debuted in 1932 as the first U.S. course made for players under 18. To witness my son’s first time on a course, armed with plastic clubs save a cut-down putter from his Pop-Pop, was priceless. Six-putting from 2 feet away and cheering when the ball plopped into the cup? We should all have such fun. (Oddly, given Spring Creek’s family-centric nature, the only lapse in service came here: Riding mowers on top of us for the first three holes – in midafternoon.)
If the golf portion of Hershey is good, it’s everything else that makes it special. Everything that you wouldn’t do, that is, as a single.
The aforementioned theme park is a blast, at least midweek in the late offseason, when it’s a breeze to get around. (Truthfully, many of the thrill-packed rides look so spectacular – borderline insane – that they surely merit long lines.) At the other end of the spectrum is the Kaymer-esque calm of the Hotel Hershey’s stunning, and kid-friendly, 23-acre Hershey Gardens. This being “the Great American Chocolate Town,” a visit to Hershey’s Chocolate World is requisite, especially when accompanied by a spouse with a sweet tooth. From a Chocolate Making Tour Ride (think diorama-laden “edu-tainment” Disney World rides) to making one’s own chocolate bar (both a hoot and a great keepsake – the custom-labeled tin, anyway, as the “Ikelicious” chocolate bar was gone quick), it’s a fun place to spend a couple of hours.
Fun is the operative word, from golf and chocolate to offerings that, save the family’s presence, I’d have overlooked, such as the bocce, croquet and tennis courts. Perhaps the most surprising thing about “The Sweetest Place on Earth” is the man who built the town, Milton Hershey, whose remarkable biography can be examined at the Hershey Story museum. The man went bust three times before making his first fortune, then risked it all again, before becoming one of the country’s greatest and most underappreciated philanthropists, with a focus on orphans and the underprivileged.
They made a movie about Hershey’s old pro, Ben Hogan. Perhaps the resort’s founder should be next.
Chocolate, Bacon Chocolate Chip Cookies
Bacon Chocolate Chip Cookies
Years ago, while vacationing in Las Vegas, I discovered Vosges chocolates. Unable to afford most of their truffles at the time, I bought the more affordable Mo’s Bacon Bar and fell in love with the milky chocolate and salty bits of bacon.
(credit: Cafe Cyan)

(credit: Cafe Cyan)

(credit: Cafe Cyan)
Adapted from Clean Eating
Makes 24 cookies
1 cup unsalted almond butter or natural peanut butter
3/4 cup sugar
1 large egg
1/2 tsp baking soda
1/4 tsp sea salt
3 oz Mo’s Dark Bacon Bar, broken into small pieces
Preheat oven to 350°F. In a medium bowl, stir together almond butter, sugar, egg, baking soda and sea salt until blended. Stir in chocolate.
Drop dough by rounded tablespoonfuls onto parchment-lined baking sheets. Bake for 10 to 12 minutes or until lightly browned. Let cool on baking sheets for 5 minutes. Remove to a wire rack and let cool for 15 more minutes.
Saturday, March 5, 2011
Chocolate Sweet
Double Chocolate Sweet Potato Oatmeal

Last night as I watched American Idol draw out two long hours of results, I had some time to do some thinking.
I wanted to create a fun Friday breakfast to celebrate the approaching weekend, incorporating fresh sweet potato into my morning oatmeal. I wasn’t in the mood to bake anything or for it to take longer than 10 minutes, so I decided that finely grating the fresh sweet potato into my oatmeal would be a sneaky way to cut down the cooking time that is normally required for such a tater.

Oh, and it worked. It worked wonderfully!
And because I was already sneaking in some veggies into my breakfast, I decided that some chocolate was in order to round it out. It’s all about the balance, right?

Normally, I am not a fan of overly sweet things in the morning, but I found that just a tablespoon of cocoa powder and 1/2 square of dark chocolate was enough to turn a normal bowl of oatmeal into something quite decadent, while still being nutritious and energizing.

Oh She Glows
Double Chocolate Sweet Potato Oatmeal
Inspired by my Carrot Cake Oatmeal and Live Well 360.Super chocolaty without a ton of sugar, this bowl of oatmeal is high in volume and taste. The grated sweet potato is a wonderful way to sneak a veggie into your morning routine!
Yield: 1 serving
Base Ingredients:
- 1/4 cup oats
- 3/4 cup finely grated sweet potato
- 1 tbsp chia seeds
- 1 cup non-dairy milk (I used organic soy)
- Pinch of salt
- 1 tbsp maple syrup
- 1 tsp pure vanilla extract
- 1/4 cup water
- 1 tbsp + 1 tsp Dutch-processed cocoa powder
- 1/4-1/2 tsp ground cinnamon
Directions:
1. In a medium sized pot, stir together the oats, milk, chia seeds, and salt. Bring to a boil and reduce heat to medium. Now stir in the grated sweet potato and the 1/4 cup of water. Cook on medium, stirring often, for a few more minutes.
2. Stir in the cocoa powder and cinnamon, being sure to get out any clumps. When the mixture has thickened up nicely, stir in the vanilla and maple syrup and remove from heat. Pour into a bowl and top with a bit of dark chocolate or your desired toppings.
Toppings I used: 1/2 square dark chocolate, 1 tbsp Chocolate Crunch Dessert Granola, few shreds of sweet potato for garnish.

First, bring the oats, milk, chia seeds, and salt to a low boil and reduce heat to medium. Now stir in the finely grated sweet potato and 1/4 cup of water. Cook on medium, stirring frequently, for a few minutes.

Now stir in the cinnamon and cocoa powder, making sure to get out all the clumps!

Chocolaty goodness!
Cook for a few more minutes, stirring frequently. Now add in the maple syrup and vanilla and remove from heat. Pour into a bowl and add your desired toppings!

On top: 1/2 square chopped dark chocolate (it got all melty and wonderful!), a few shreds of sweet potato for garnish, and 1 tbsp of granola.

The result is a super chocolaty and decadent-tasting bowl of oatmeal with a ton of volume thanks to the sweet potato. It was just the right amount of sweetness for me, but of course you can always adjust to your own taste buds!

I’ve seen this blog survey making the rounds so I decided to fill it out myself (I also did this while watching American Idol last night!).
A-Z Survey
A. Age: 27B. Bed size: King (as of 2011)…can’t believe we waited so long! I think my legs are getting longer from all the stretching I do now.
C. Chore you dislike: Scrubbing tile floors
D. Dogs: growing up- Pepper + Jasmine….RIP!! Both muts, both amazing dogs. I can’t wait to adopt my next one. I’m a huge, huge, huge dog lover. I was never a cat fan until Eric bought Sketchie! Now I love both cats and dogs, but I am still partial to dogs….shhhh.
E. Essential start to your day: Slippers
F. Favorite color: I can’t pick just one so- Blue, Pink, Orange, Green. I love colour!
G. Gold or silver: Gold…I’m old school and it looks best with my skin tone. I prefer silver for house décor though.
H. Height: 5’4.5" (but with my stilettos 5’9"!)
I. Instruments you play(ed): Well, let me just say that my best friend and I were formerly (currently!?) known as the ‘Squeak Sistas’…we rocked that Clarinet throughout school! Squeak!
J. Job title: Business owner/recipe developer/photographer/blogger/dish washer/molly maid.
K. Kids: Just Sketchie and our stuffed animals right now!
L. Live: Gorgeous green & hilly countryside…aka: The Sticks. We have 1 traffic light. Seriously. We did the big city thing for a couple years and did not enjoy the traffic headaches, pollution, and congestion.
M. Mom’s name: OSGMOM….Or Lori.
N. Nicknames: Dawn (middle name), Angie/Ange, Granola (one of my friends started calling me this when I went vegan! ha), Martha, shots, Lulu, Lil Gal, Skirts, Lids.
O. Overnight hospital stays: None yet…*knocks on wood*
P. Pet peeves: Stinky feet, finding another person’s hair in a hotel bathroom, pesticides on produce, finding used bandaids on the ground/swimming pool, when post office loses my parcels, Tigerblood, thinking I have a food in the fridge and finding out it is GONE!
Q. Quote from a movie: ‘You guys look like a bunch of ice cream cones!’ (Any guesses?)
R. Righty or lefty: Righty, but I used to try to teach myself how to be ambidextrous when I was young. no such luck.
S. Siblings: Sister Kristi, half-sis and half-bro: Kerrie and Chris, Step sis and step bro: Jennifer and Michael.
T. Time you wake up: Between 7-7:30am. Bedtime is 11:30-12:00 (we are both night owls and LOVE to stay up late, especially on weekends!).
U. Underwear: Oh I didn’t think this was that kind of questionnaire!
V. Vegetables you don’t like: Chard. That is the only one I can think of, so I guess I’m doing good!
W. What makes you run late: Traffic, Blogging, unexpected clothing freak-outs. I’m usually early though and hate to be late.
X. X-rays you’ve had: Teeth, pelvic area (when I had pelvic strain from running in 2009), Head (I fell on the ice and hit my head in 2008…outcome still unclear!).
Y. Yummy food you make: I’m really loving my spin-off oatmeals lately.
Z. Zoo animal favorites: The animals that are released back into the wild!
PS- My current American Idol Favs are: Paul, Pia, Haley, and Casey! What about you?
Chocolate Mania
Chocolate Prices, CA Chicken and Pork Recall, Mardi Gras Cake, New Ben & Jerry Flavor

Every Friday we’ll spotlight a few key stories in the week of food news. Please feel free to share links to stories you think are important:
- Google introduces new recipe search feature (San Francisco Chronicle)
- Chocolate prices are on the rise (Business Week)
- California food merchant recalls 64,000 chicken and pork products (LA Weekly)
- Bakers reimagine Mardi Gras cake (Washington Post)
- Ben & Jerry’s latest ice cream flavor is Jimmy Fallon’s ‘Late Night Snack’ (Huffington Post)
Monday, February 28, 2011
Thick and Chewy Chocolate
Chocolate - Thick and Chewy Chocolate Butterscotch Chip Cookie

These Thick and Chewy Chocolate Butterscotch Chip Cookies are destined to become your favorite cookie. A twist on the traditional chocolate chip cookies, these oversized cookies are exploding with chocolate and butterscotch chips. Thick from the edge to the center, chewy and soft. Serve warm from the oven with a cold glass of milk!
Thick and Chewy Chocolate Butterscotch Chip Cookies
Printer Friendly Version
Ingredients:
- 2 cups plus 2 Tbsp all-purpose flour
- 1/2 tsp baking soda
- 1/2 tsp salt
- 12 Tbsp (1 1/2 sticks) unsalted butter, melted & cooled until warm
- 1 c brown sugar, packed
- 1/2 c granulated sugar
- 1 large egg plus 1 yolk
- 2 tsp vanilla extract
- 3/4 cup semisweet chocolate chips
- 3/4 cup butterscotch chips
- Preheat oven to 325°F. Line 2 baking sheets with parchment paper; set aside.
- In a medium bowl, whisk together flour, baking soda and salt; set aside.
- In the bowl of a stand mixer fitted with the paddle attachment, beat butter and sugars until thoroughly combined. Beat in egg, yolk and vanilla until combined. Add dry ingredients and beat at low speed just until combined. Stir in chips.
- Roll a scant 1/4 cup dough into ball. Holding dough ball in fingertips of both hands, pull into 2 equal halves. Rotate halves 90 degrees and, with jagged surfaces facing up, join halves back together into one ball so that the top surface is jagged. Place onto prepared cookie sheet, spacing 2 1/2 inches apart.
- Bake until cookies are light golden brown, outer edges start to harden, and centers are still soft and puffy, about 15 to 18 minutes, rotating the baking sheets front to back and top to bottom halfway through the baking time. Cool the cookies on the baking sheets. Remove cookies using a wide metal spatula. Store in an airtight container at room temperature.

Subscribe to:
Posts (Atom)