Monday, February 28, 2011

Chocolate Mini Turkey Tart

How To Make Chocolate Filled Mini Turkey Tarts

 There s something magical about desserts that look like they took an eternity to make, but really don t. This recipe can be whipped up in less than 15 minutes and perfect for kids to lend a hand with — plus it puts to use specialty cookie cutters (like this turkey) that only see the light of day a few times a year!

What You Need
Ingredients
1 recipe pie dough (we won t tell if you use store bought, it works fine)
1 bag chocolate chips (peanut butter and butterscotch are great too!)
1 egg
sanding sugar
Equipment
1 pastry brush
cookie cutters of choice
parchment paper
baking sheet
small bowl
Instructions
1. Gather & Pre-Heat: This recipe is rather assembly line in nature, so having all your ingredients ready to go makes things infinitely easier. Pre-heat your oven to 375 degrees to get things going.
2. Whisk Egg: Mix 1 whole egg in a small bowl until combined. Set aside, but not too far from your baking sheet so there s less drips!
3. Roll Out Pie Crust: If you re using homemade, your goal is 1/8 of an inch. It doesn t have to be perfect, but as close as possible is always a good thing. If using store bought, unroll or thaw slightly and slip out of the pan onto a lightly floured surface.
4. Cut Your Shapes: You ll need two of everything, so cut as many pieces as possible in even numbers. The smaller your cutter the more you ll end up with, the larger it is, the less you ll end up with (obviously), but remaking extra dough is no big deal once the first batch hits the oven.
5. Place On Baking Sheet: Place 1 layer of dough cut outs on the baking sheet lined with parchment paper. Leave an inch between each (more if it s handmade dough and slightly thicker) piece. Save the tops for a different step.
6. Add Filling: Add a small amount of chocolate chips (say a tablespoon for large ones, less for smaller), making sure to keep them in the center of each shape and keeping them away from the edges.
7. Seal: Using the pastry brush, run a line of egg wash around the outside of the filling on the edge of the pie crust. Place the top piece over it and gently press the edges together. You shouldn t have to press hard as the egg does the work for you, but making sure all the edges touch is imperative to having them come out of the oven without leaks!
8. Wash and Sprinkle: Go over the top of each tart with your egg wash and gently sprinkle with granulated sugar or sanding sugar of your choice.
9. Bake: Allow tarts to bake for 10-15 minutes (depending on size) or until golden brown. Allow to cool on parchment paper before transferring to a cooling rack (though the entire sheet of parchment paper can be moved to a rack to reuse the pan for the next batch).
Additional Notes:
You can use almost anything as filling so if you re running low on chocolate chips (or chips of any kind for that matter), don t despair and try a little peanut butter and jelly, or even just jelly. Stray bits of candy, marshmallows or even a bit of cheese can get the job done if you re looking for a healthier alternative.
Need Some Help Perfecting Your Pie Crust?
• How To Make Pie Crust From Scratch
• Finishing Touches: How to Get a Perfect Golden Pie Crust
• Trader Joe s Pantry: Trader Joe s Frozen Pie Crusts
Want more smart tutorials for getting things done around the home?
How To Make Chocolate Filled Mini Turkey Tarts


chocolate raspberry cake recipes

Chocolate Recipes - chocolate raspberry cake

Let me get straight to the point and tell you that this is one of my very favorite cake recipes.  It’s chocolate (which scores it several points right off the bat) accented by a delightfully tart raspberry filling.  The layers are moist and rich and the three of them piled up together give it some impressive height.

The cake is a little more complex and the ingredients are a little pricier than the average cake (especially because I always seem to accidentally buy twice as much chocolate as necessary because the original recipe calls for a ganache filling instead of raspberry), but it’s definitely worth it.  Still, I currently only make it once a year for the annual February get-together for the birthday celebration of my mother-in-law and sister-in-law.
Chocolate Raspberry Cake
This year’s family get-together was especially fun with the addition of Jill, an old college friend of my brother-in-law and sister-in-law, and because my niece, Amelia, is now nearly 2 1/2 years old. We don’t get to see Amelia nearly often enough and each time we see her it’s like I’m looking at a whole new person!  She grows and develops new skills so quickly and it’s so cool to see how much she has changed.

I had the great honor of being her guest of honor at many, many tea parties over the course of the weekend.  I don’t hang out with many 2-year olds and was amazed at how happy she was to do the same thing over, and over, and over again.  And over again, and again.  Amelia has such a sparkle in her eye and a laugh that can only make me smile inside and out, so there’s nothing I would have rather done this weekend than sit and sip tea with Amelia, Coco, Baby Duck, Mama Duck, and Owl.  It was a really fun weekend that kept my mind off my upcoming knee surgery and left me feeling renewed and very, very well fed.
Chocolate Raspberry Cake

Double Chocolate Layer Cake

Adapted from Gourmet, March 1999 via Smitten Kitchen
This isn’t a very complicated cake, but there are still a few steps to it.  To make it a little more manageable, I like to make the layers one night, wrap them tightly in plastic wrap and freeze them.  The next day, I make the raspberry filling and ganache and assemble the cake.
For cake layers
3 ounces fine-quality semisweet chocolate such as Callebaut
1 1/2 cups hot brewed coffee
3 cups sugar
2 1/2 cups all-purpose flour
1 1/2 cups unsweetened cocoa powder (not Dutch process)
2 teaspoons baking soda
3/4 teaspoon baking powder
1 1/4 teaspoons salt
3 large eggs
3/4 cup vegetable oil
1 1/2 cups well-shaken buttermilk
3/4 teaspoon vanilla
For ganache frosting
This makes  enough for a very thin layer of frosting.  If you want more frosting, you might want to make an additional half recipe.  It’s a rich cake and I don’t think it needs the extra frosting, but wanted to give you a heads up that it is a thin layer.
8 ounces fine-quality semisweet chocolate such as Callebaut
1/2 cup heavy cream
1 tablespoon sugar
1 tablespoons light corn syrup
2 tablespoons unsalted butter, cut into small pieces
Raspberry Filling
You could probably get away with only making a half recipe, but it’s nice to have extra raspberry puree on hand (and hey, you can slather it right on your cake if you want more raspberry goodness.
2 10-ounce bag frozen raspberries, thawed
1/2 cup sugar
2 tablespoons cornstarch
Special equipment: three 9-inch round cake pans
Make cake layers:
Preheat oven to 300F and butter pans. Line the bottoms with rounds of parchment and butter the paper.
Finely chop the chocolate and place in a medium-sized nonreactive bow.  Pour the hot coffee over the chocolate and let the mixture stand, stirring occasionally, until the chocolate is melted and the mixture is smooth.
In a large bowl sift together sugar, flour, cocoa powder, baking soda, baking powder, and salt. In another large bowl with an electric mixer beat eggs until thickened slightly and lemon colored (about 3 minutes with a standing mixer or 5 minutes with a hand-held mixer). Slowly add the oil, buttermilk, vanilla, and melted chocolate mixture to eggs, beating until combined well. Add the sugar mixture and beat on medium speed until just combined well.
Divide batter between pans and bake in middle of oven until a tester inserted in center comes out clean, 35-45 minutes.
Cool the layers completely in pans on racks. Run a thin knife around edges of pans and invert layers onto racks. Carefully remove parchment paper and cool the layers completely. Cake layers may be made 1 day ahead and kept, wrapped well in plastic wrap, at room temperature, or can be frozen for several days.
Make Raspberry Filling
2 10-ounce bag frozen raspberries, thawed
1/2 cup sugar
2 tablespoons cornstarch
Puree the raspberries in a food processor, blender or immersion blender. Press the puree through a fine-mesh strainer with the back of a spoon, removing the seeds. Heat the puree in a small pot with the sugar and cornstarch until mixture boils, stirring constantly. As it boils, it should thicken quickly.  Let it thicken to about the consistency of cold maple syrup.
Let it cool complete before spreading it over two layers.
Make frosting:
Finely chop the chocolate. In a 1 1/2- to 2-quart saucepan bring cream, sugar, and corn syrup to a boil over moderately low heat, whisking until sugar is dissolved. Remove pan from heat and add chocolate, whisking until chocolate is melted. Cut butter into pieces and add to frosting, whisking until smooth.
Transfer the frosting to a bowl and cool, stirring occasionally, until spreadable (depending on chocolate used, it may be necessary to chill frosting to spreadable consistency). If necessary, you can stir the ganache over a bowl of ice water to cool it off quickly and evenly.
Spread frosting between cake layers and over top and sides. Cake keeps, covered and chilled, 3 days. Bring cake to room temperature before serving.


Chocolate Ginger

Chocolate - Chocolate Ginger


Plain chocolate. Ginger, crystalised (tasty) or stem (heaven).
Wonderful. Addictive. Ahhhhh….


CRYSTALISED GINGER
Costiness: £2.47 for 250g from A Quarter Of


STEM GINGER
Costiness: £3.10 for 250g or £29.99 for the whole 3kg jar


Sunday, February 27, 2011

Chocolate Boule

Cranberry Chocolate Banana Sourdough Boule


My son has been begging for banana bread.  I have been obsessed with sourdough boules.  So I found the recipe for Cranberry Chocolate Sourdough on SourdoughHome.  As you can already guess, I decided to make it, adding the bananas.  It was a mixing nightmare, super elastic dough, smushy bananas & boiled cranberries refusing to be mixed in.  So I just kind of squished it together and over 3 hours attempted some S&F's.  After 3 hours it finally relaxed & I was able to shape it into a kind of boule and bake it.  Pictured are the results.  I thought for sure I'd made another flop, but we all like it, weird as it is.


Chocolate White Ginger flavored

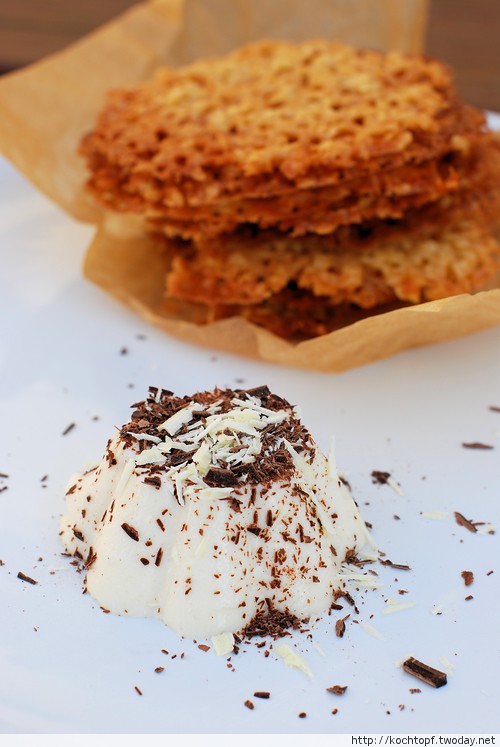
White Chocolate Ginger flavored Panna Cotta and Florentine Cookies for Daring Bakers

I made Panna Cotta, the typical Italian dessert, before. So the February challenge of Daring Bakers was quite easy for me. The Florentine cookies, which by the way I know only with nuts and candied fruits, were a bit of a challenge. Like some other Daring Bakers I ended up with huge cookies. Fortunately still delicious!

For the Panna Cotta I used a ginger flavored white chocolate I recently received for a secret chocolate test. Very yummy! Instead of filling the cookies with chocolate I sprinkled some over the white Panna Cotta, so at least it visible on the white plate. ;-)

White Chocolate Ginger flavored Panna Cotta and Florentine Cookies for Daring Bakers
For the recipe please head over to the Daring Kitchen Headquarter. There you will also find all the Panna Cotta and Florentine Cookies my fellow Daring Bakers made.
The February 2011 Daring Bakers challenge was hosted by Mallory from A Sofa in the Kitchen. She chose to challenge everyone to make Panna Cotta from a Giada De Laurentiis recipe and Nestle Florentine Cookies.


Chocolate Cakelet


Recipe: Fudgy Chocolate Cakelets with a Pinch of Glamour


Recipe Fudgy Chocolate Cakelets with a Pinch of Glamour Recipe: Fudgy Chocolate Cakelets with a Pinch of GlamourRecipe: Fudgy Chocolate Cakelets with a Pinch of Glamour
The 83rd Academy Awards take place this Sunday night, a feast of movie glitterati and glamour for those of us who enjoy such things. Are you planning to throw an Oscars bash, complete with red carpet? If so, then you should definitely include these little starlets — easy fudgy chocolate cakes all dressed up with a pinch of glamour.
Underneath their red gowns and sparkling glitter, these little cakes are quite ordinary. They are mixed up in a pan like my favorite brownie recipe, and they take all of 5 minutes (truly!) to mix up. In fact, the last time I made these I whipped them up while idly waiting for overdue guests. They are stress-free and completely reliable.
But dress them up a bit and wow! They can make quite an entrance. See, these aren t just ordinary brownies or chocolate cake. They are extra-dense, and extra-fudgy. They aren t exactly flourless cake or those hot molten lava cakes either. They can be baked in liners and passed around at a party. But if you serve them warm then oh, that first bite just melts in your mouth, like the best performance butter and chocolate can make together.
These aren t terribly sweet. I like to lighten the taste with just a swirl of lightly sweetened whipped cream and, if you are so inclined, a scattering of edible gold stars.
Fudgy Chocolate Cakelets
makes 6 cakelets
3 ounces semi-sweet chocolate
1/2 cup unsalted butter
1/2 cup brown sugar
1/4 cup white sugar
1 teaspoon vanilla
1 tablespoon bourbon (optional)
1/4 teaspoon salt
2 eggs
1/4 cup cocoa powder
1/4 cup cake flour
Heat the oven to 325°F and line 6 wells in a muffin pan with paper liners. Lightly spray the liners with baking spray.
Place the chocolate and butter in a 1-quart saucepan over medium heat. Melt the butter and chocolate, stirring frequently. As soon as both are completely melted, turn off the heat. Stir in the brown sugar and white sugar, as well as the vanilla, bourbon, and salt. Stir in both eggs, and the cocoa powder and cake flour.
Divide the batter evenly among the 6 cupcake liners. Bake for 18 to 20 minutes, or until the middles of the cakelets are just barely set.
Serve warm with a touch of whipped cream and razzle-dazzle sprinkles, if so desired.

Sunday, February 20, 2011

Chocolate Indonesia

Chocolate Fudge Muffins


Because of the fudge they can come out quite sweet, so definitely one for the dessertaholics amongst us.
I’ve messed around with this recipe quite a lot. Because it’s so easy to get right, there’s a lot of room for experimentation.
I would normally use chocolate chips in this muffin recipe (white chocolate chips with this are absolutely delicious) but today I thought I’d give it a whack with some fudge. The only problem with the fudge is that it sinks to the bottom of the mix, so you end up with a really sticky bottom and if you don’t turn them out straight away it’s nearly impossible to get them out of the moulds.

This time, I also tried using a mixture of cocoa powder and Galaxy hot chocolate and they turned out great with the resulting muffins really airy and springy. The taste is different, but I think it's a good difference, it's really up to you to experiment and see what you like best.
You’ll need to prepare a tin with 12 large muffin cases, or around 15 - 20 medium sized muffins cases.

Preheat the oven to 170 degrees C.
You Will Need:
- 2 large eggs
- 200g caster sugar
- 130g plain flour
- 50g cocoa powder (I used 25g cocoa powder, 25g Galaxy hot chocolate)
- 160g unsalted butter, melted
- 2 teaspoons baking powder
- 160ml whole milk
- Vanilla extract
- 100g fudge (or 100g chocolate chips, depending on what you're trying)
The Method:
1. Put the eggs and the sugar in a bowl and mix them together until you get a light pale mixture.
N.B. You'll note that if you leave it for a minute or so while you're measuring other ingredients that it's gone a bit frothy - this is just the sugar, so give it another quick mix before adding anything else.
2. Put the flour, baking powder and cocoa powder into a bowl and mix it all together.
3. Add the vanilla extract to the milk and mix it together.
4. Put some of the cocoa mixture into the sugar and egg mix and stir it together until it's well mixed.
5. Then add some of the milk and vanilla and mix it through until it's well incorporated.
6. Repeat these two steps until you've added all the cocoa powder mixture and all the milk.
Quickly beat it for a few minutes until it's all completely mixed together.
7. Now, add in the melted butter and stir it into the mix until it's combined.
8. Finally add in the fudge (or chocolate chips) and stir them in by hand to make sure they are spread evenly throughout the mixture.
N.B. Don't be concerned if the mixture seems quite more liquid than you expected, this is exactly how it's supposed to be at this stage, so don't add more flour or cocoa powder or you won't get the lovely muffiny texture.
9. Spoon the mix into muffins cases, or mould, until they're just over two thirds full to allow for rising.
You then need to bake them in the oven for 30 minutes.
To check that they're done, stick a knife into the middle, if it comes out clean, then they're ready. If you're using silicone moulds then they will be coming away from the sides.
10. Turn then out as soon as you can and leave them to cool on a wire rack.
Once they're cool, you'll need to keep them in a tin to make sure they stay moist and muffiny, and don't dry out and get chewy.