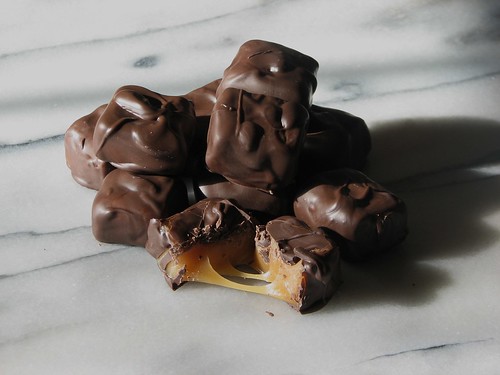
Chocolate Covered Caramels
 Happy Sunday Bread (Candy) Heads! All knowledge is dangerous, some pieces more so than others. This week I'm going to share a very dangerous piece of knowledge, how to make caramels! Like bread there is a lot of really crappy caramel out there in the world. Good caramels should be creamy, with a strong dark note of cooked sugar. It should not be too soft nor too sticky. The good news is that I have a perfect recipe for caramels that anyone with a candy thermometer can make. |
| Something The Dog Said :: Sunday Bread - Chocolate Covered Caramels |
| I have been messing around with making caramels for the last 15 years. Over that time I have tried a lot of different recipes. Finally about five years ago I decided to synthesize one. What I was looking for was more flavor while maintaining the lack of stickiness and the al dente consistency. It turns out that it all comes down to the amount of fat and the types that you use to cook the sugar. This recipe has condensed milk, whole milk, whipping cream and butter in it. Lots of different styles and moisture levels in the dairy give this caramel the complexity I was looking for. Enough chit chat! Let's make some candy!
Chocolate Covered Caramels
2 cups light corn syrup Equipment: 1 9"x13" baking pan Method: Before we get started, we have to talk about the 6 quart pot. Not everyone has one that big but you have to have it for this recipe. If you try to make this in a smaller pot it will almost certainly boil over. Trust me on this, I have burned my hands with hot sugar more than once trying to control the developing caramel in a smaller pot. So if you want to avoid scars (yeah it always scars) on you hands, don't cook this in a smaller pot. Also this recipe does not cut down well. The size pan you would need doesn't really exist and the caramel does not set up properly if it is too thick or to thin. This is not to say that it is inedible, just not something you'd want to share with friends and family with pride. Just make it the way I describe and you'll be safe and happy with the result. Butter your 9"x13" pan and set aside. In your 6 quart pot, combine the cream, milk, corn syrup, butter and sugar. Place over medium high heat cook, stirring occasionally with a wooden spoon. When the butter is melted clip on your candy thermometer. Cook, stirring constantly, until the thermometer registers 240 degrees (over 5000 feet reduce this temperature to 228). This is going to take about 40 minutes. You will be tempted to turn the temperature up, don't do it! You will be tempted to leave the stove for a while, again don't do it! The thing that messes up candy making more than anything is too high temps and inattention, you want a great end product, then you have to follow the rules. Besides, it is kind of cool process to watch. The mixture starts out white as the driven snow, but slowly and the water evaporates and the sugar cooks it becomes yellow then light golden. It will bubble up quite high, but just keep stirring and it will not boil over. Finally as you approach the finish line it will thicken and darken. The bubbles will seem more syrupy and the mixture will subside and boil lower in the pot. Right when the temperature gets to 240 (or 228 at higher altitudes) pull the pan off the heat and stir in the vanilla. The vanilla has a much lower boiling point than water so it is going to boil as soon as it hits the hot caramel. Don't worry, it is not a problem, in fact is a good thing as it will release a heady smell into your kitchen and darken the caramel to it final dark golden color. Pour the caramel into your prepared pan. Don't scrape down the sides of the pan, just pour out what will come out by itself. This is to prevent getting any sugar crystals that are on the sides of the pot into the pan. They would act as seed crystals and make your caramel grainy. Let the pan stand for at least 8 hours or over-night uncovered. Now it is time to dip the caramels! There is no need for the chocolate from a flavor point of view but it does help the caramels keep their shape and makes them easier to handle and store. Dipping caramels is best done with two people. One cuts and forms the squares and one does the dipping. The reason for this is perfectly cooked caramels tend to flow and stick just a little bit when they are first cut. It is best to get them in the chocolate as fast as you can. Place all two pounds of chocolate in a 8"x8" baking dish. Turn your oven on to Warm and place the dish in the oven. After 10 minutes stir the chocolate (not all of it will be melted but it will help the process) let it go for another 10 minutes then check to see if it is all melted. We are looking for the chocolate that is melted but not hot at all. If the chocolate is more than warm, it will tend to make your caramels flow and they will not hold the square shape. Set up a dipping station, with a spot for the cutter to cut and form the cubes to non-dominate hand of the person doing the dipping. Have a place for them to land the cubes when they are read to dip. Then should come the chocolate, then a sheet pan lined with parchment paper. To dip the caramels, cut out a piece 1" wide and the length of the short side of your pan (9"). Cut the strip into 9 pieces of about one inch each. Using the thumb and index finger of both hands form the pieces into cubes. The person dipping the chocolate be staring the chocolate with their dominate hand. Pick up one of the cubes with your off hand and place it in the chocolate. Make a cage of the fingers of your dominate hand and swish the caramel back and forth in the chocolate. Pick up the cube and let some of the chocolate drain off of it. Check that it is covered on all sides, and if there is caramel showing, paint that spot with a chocolate covered finger. Place on the sheet pan. Repeat until you have dipped all the caramels. If your chocolate starts to harden (it might it takes a while to dip over 100 caramels) or you just need a break, put the chocolate back in the oven and let it warm up. Let the candy stand until it is dry and then place in small paper cups to store. Store in an air tight container for up to 3 weeks. Simple, right? Plus these are the very best caramels you'll ever eat! You can even make this into a caramel sauce by stopping the cooking process at 230 (218 at altitude) and just storing it in jars. Now for some housekeeping. I messed up and we are going to run out of time before Christmas for a third candy recipe. Sorry about that, but I will make it up to you by next Sunday by teaching you how to make Croquembouche. What is Croquembouche? It is a pyramid of cream puffs stuffed with either vanilla bean or mocha pastry cream then covered in a web work of caramel. It is a real show stopper at New Years Eve Parties! Also about my cook book "A Liberal Sprinkle of Flour". With the best will in the world I had no idea what it would take to produce a book like this myself. I really under estimated the time it would take and there is just no way it is going to come out before the first of the year. It is still going to drop, but if you were going to buy it for a Christmas present, well it will be a late one. Again sorry about that. I probably should have started in October instead of the middle of November. |
No comments:
Post a Comment